

Do you want to build a pay-per-view site with WordPress? Selling premium content and information is an excellent way to earn money online.
In this step-by-step guide, we‘ll explore how to:
✅ Configure WordPress paywalls with a membership plugin
✅ Set up secure subscriber payments
✅ Lock restricted content behind a paywall
✅ Redirect unauthorized visitors
Let‘s get started.
Why Build a Pay-Per-View Website?
A pay-per-view site charges visitors to access certain pages and content. You directly sell information on your website.
Benefits of using WordPress for pay-per-view include:
- Keep more profits instead of split earnings from display ads
- Establish recurring revenue through subscriptions
- No need for affiliate links or sponsors
- Use scarcity and urgency with expiring content
According to HubSpot, websites with gated content generate over 2X more leads than those without gates.
Paywalls also convert visitors into paying customers who spend more over their lifetime.
Choosing the Best WordPress Hosting
Your web hosting provides the server space and speed you need to run WordPress sites smoothly.
Here are top providers specifically optimized for WordPress:
| Host | Starting Price | Features |
|---|---|---|
| Bluehost | $2.75/month | Free SSL, CDN, staged caching |
| SiteGround | $3.99/month | In-house WordPress experts, SG Optimizer |
| Kinsta | $30/month | Google Cloud Platform, free CDN, clones for staging |
I recommend Bluehost for most pay-per-view sites. Their low pricing is perfect for new sites with budget constraints.
After registering your domain and signing up for web hosting, you can easily install WordPress with their automated platform.
Step 1 – Installing WordPress
The famous 5-minute WordPress installation makes setting up your site straightforward.
Here‘s an overview:
Login to your web hosting cPanel dashboard
Navigate to the WordPress Installer section
Enter your site details like domain name
Confirm installation
After the install finishes, you can access your WordPress admin dashboard to start building.
Refer to WordPress Codex for full manual installation steps.
Step 2 – Adding MemberPress Plugin
To create paywalls in WordPress, a membership plugin is required.
The best choice for pay-per-view sites is MemberPress.
MemberPress handles everything from restricting content to processing subscription payments securely.
After installing MemberPress, enter your license key under Settings to activate full functionality.
Step 3 – Configuring Payment Gateways
With MemberPress running, you need to set up payment gateways to collect fees.
Popular WordPress payment processors like Stripe and PayPal integrate seamlessly:
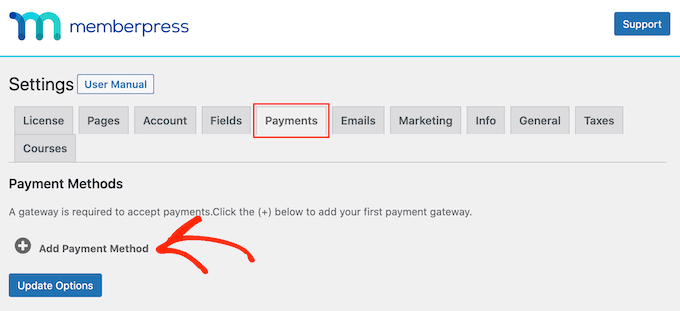
Under MemberPress » Settings » Payments tab, add a payment method.
Configure required credentials like:
- API keys
- Merchant account email
- Payment success/failure webhooks
To allow visitors to pay using preferred options, enable multiple payment gateways.
Step 4 – Building Membership Levels
Now we‘ll create the actual subscriptions that visitors can purchase.
Navigate to MemberPress » Memberships and click Add New.
Configure your custom membership level:
Pricing tab
- Set one-time or recurring billing
- Specify access length (lifetime, days, weeks, months)
Options tab
- Limits on downloads or profile fields
Price Box tab
- Describe exclusive member benefits
Repeat to make multiple subscription packages (Free, Pro, VIP access).
Step 5 – Limiting Access with Paywall Rules
MemberPress contains powerful rules to restrict content including:
✅ Entire website
✅ Individual posts/pages
✅ By categories or tags
✅ Custom post types
Under MemberPress » Rules, click Add New.
Select conditions like Users NOT logged in or Users WITHOUT membership level.

For example, restrict posts with a Premium tag to paying users.
Enable content dripping and time-based restrictions too.
Step 6 – Creating Pricing Pages
Well-designed pricing pages successfully display available subscription plans.
Navigate to MemberPress » Groups to make a pricing page:
- Add Group
- Give it a title
- Select desired membership levels to showcase
- Customize theme design
Publish when ready.
Step 7 (Bonus) – Redirecting Unauthorized Visitors
What if someone finds premium content URLs and tries accessing without paying?
You can automatically redirect unauthorized visitors.
Go to MemberPress » Settings » Pages tab and enable:
🔒 Redirect visitors lacking permission
👉 Enter pricing plans page URL
This gently nudges visitors to upgrade.
And that wraps up our complete guide to creating a pay-per-view site with WordPress!
The key steps are:
- Finding fast WordPress hosting
- Installing MemberPress plugin
- Configuring secure payment gateways
- Building subscription levels
- Limiting access with rules
- Creating pricing pages
- Redirecting unauthorized visitors
Follow those seven steps and you‘ll have a profitable paywall system running very quickly.
Let me know if you have any other questions! I‘m happy to help WordPress experts like yourself.

