If you’ve acquired a proxy but don’t know how to set it up on Windows 10, don’t worry. Read on to learn to configure proxy settings on a Windows 10 computer.
Surfing safely using a Windows 10 computer will require that you use proxies to boost your anonymity. But how do you go about setting up a proxy on a Windows 10 computer? For starters, proxies are essential tools when scraping or browsing through the internet. You may want to access geographically restricted data and proxies will help you pass through such firewalls.
To answer the question, below are methods you can use to configure proxy settings on your Windows 10 computer.
How to Set Up A Proxy Server On Windows 10?
There are various ways you can use to set up a proxy server on a Windows 10 computer. Read on to find out.
Method 1: Automatically Set Up
These configurations apply on Windows 10 computers connecting via WiFi or Ethernet connections. A different setup will be needed for a VPN connection. Follow these steps to set automatic configurations on Windows 10.
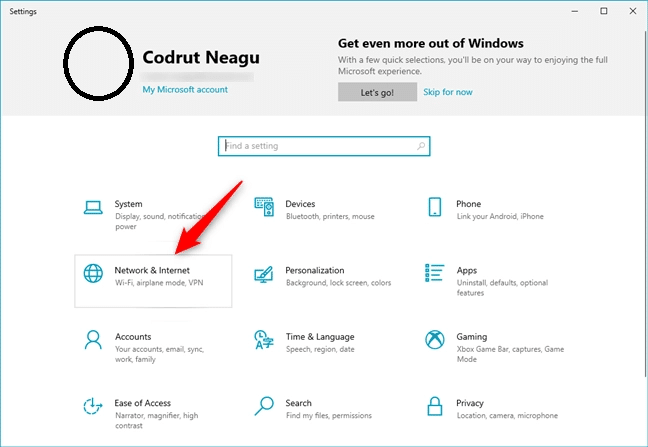
Step 1: Go to settings on Windows 10 menu
Step 2: Select “Network & Internet”

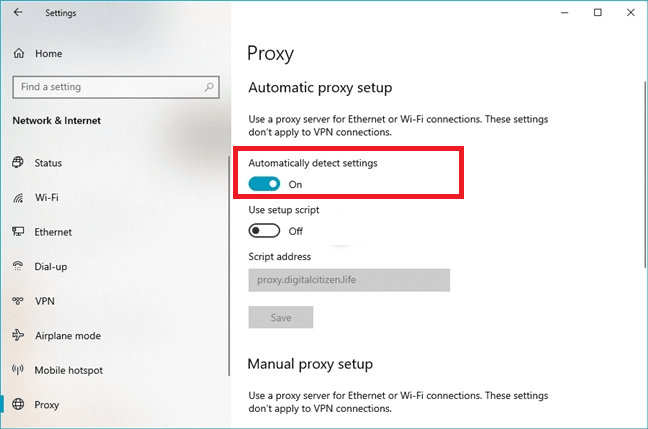
Step 3: Choose “Proxy”

Step 4: Enable the “Automatically detect settings” toggle button

These settings allow Windows 10 to instantly detect proxies even when used by a school or an organization. Turning off the automatic detection setup is as easy as taping the toggle switch.
Method 2: By Setting Up a Script
You can also configure your proxy server through a setup script. It is more of a manual method but still, the setup is automatic. To start, ensure you have a proxy address that you can use. When a script is required, provide the IP or URL of the proxy server you’re using. To elaborate on this better, follow the following steps.
Step 1: Click on “Settings” on your Windows console
Step 2: Go to “Network & Internet”
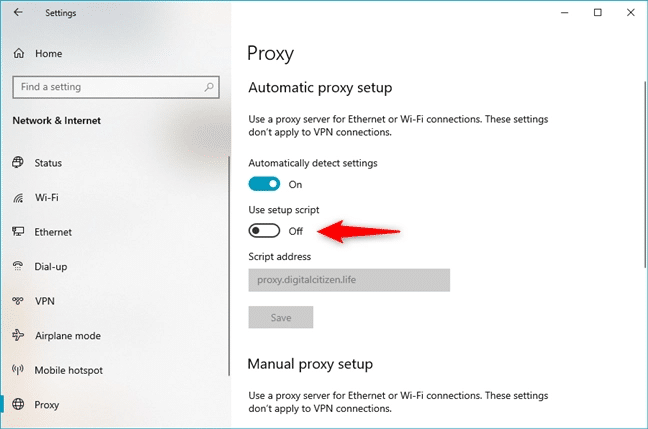
Step 3: Enable “Use setup script”

Step 4: Fill in the script address and tap “Save”
Method 3: Manually Set Up
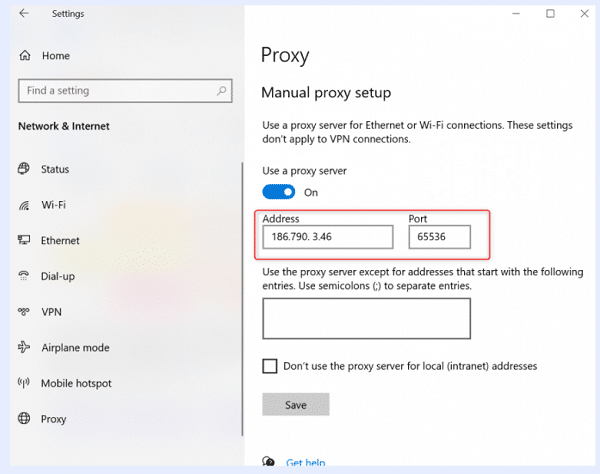
Manually setting up a proxy on your Windows 10 requires a different process from the above two. For this to work, you must first disable the “Use setup script” tab and then enable “Use a proxy server” in the manual setup area. Ensure you have the exact port number and IP address of your proxy for a successful setup.
Here’s a step-by-step process of a manual proxy setup on Windows 10.
Step 1: Click “Settings” on the Windows 10 start menu

Step 2: Select “Network & Internet” then choose “Proxy”

Step 3: At the “Manual proxy setup” tab, enable “Use a proxy server”
Step 4: Enter the proxy server address at the “Address” tab

Step 5: Fill in the proxies port number then click “Save”
With these settings, all your internet traffic will be passing through the proxy server first. You can, however, limit this by specifying the addresses you would like to have direct access. If the addresses are more than one, you can separate them by placing a semicolon after each. Unless needed, you don’t always have to have your data flowing through third-party servers.
How to Check If Your Proxy is Working?

While we feel safe when browsing or scraping data using proxies. Sometimes we’re curious to know if they are working or not. It is also necessary when getting into geographically restricted websites to avoid detection. Various factors form the basis of proxy testing. These include location, speed, IP databases, and more.
You can start by using free web IP checkers such as WhatIsMyIp, WhatIsMyIpAddress, and WhatIsMyProxy. By getting into any of these websites, you will immediately see your IP address details. These include your location, ISP, and other parameters. Such details will tell if your proxy is working or not.
Why Are My Proxy Settings Greyed Out?
When trying to access your proxy using a Windows 10 computer, you may sometimes notice that the settings tabs are greyed out. This renders them nonfunctional making it impossible to enable or disable your proxy settings. For such a problem, you may want to check the proxy settings applied at the Local Group Editor.
To find that setting and turn it off, here are the steps you can follow.
Step 1: Type “gpe” on the search console and choose “Edit Group Policy”
Step 2: At the “User configuration” part select “Administrative templates”
Step 3: Choose “Windows components” then “Internet Explorer”
Step 4: Select “Prevent changing proxy settings”
Step 5: On the new window choose either “Disabled” or “Not Configured” and then save the settings
Step 6: For these changes to take effect, you’ll need to either restart your file explorer or the computer. After this, you should be able to turn proxy settings on or off.
Conclusion
Configuring proxy settings on Windows 10 is not as hard as you might think. You only need to follow the few easy steps discussed herein and you’ll be good to go. While at that, you need to have the best proxies for better online protection. Use highly recommended proxies like Bright Data, Soax, and Smartproxy.


