

As a WordPress consultant with over 10 years of experience, I often get asked: "What‘s the easiest way to add a weather forecast to my site?"
It‘s a great question. Showing weather information can boost conversions and keep visitors on your site longer.
But if you‘re a beginner, adding weather widgets can sound complex.
Not to worry! In this detailed guide, I‘ll walk you through how to easily add a weather forecast to WordPress using a free plugin that takes just minutes to set up.
3 Big Benefits of Showing Weather Forecasts on Websites
Before we dig into the step-by-step instructions, let me share some key reasons you may want to display weather conditions:
1. Drives Hotel and Travel Bookings
Weather forecasts reduce uncertainty for travel planning. In fact, 70% of travelers check the weather as one of the most important factors when booking hotels and flights.
By showing the upcoming forecast on your site directly, you make it effortless for visitors to evaluate destinations. This motivates bookings when conditions look sunny and welcoming.
2. Helps Event Venues with Planning
For outdoor festivals, conferences, and ceremonies, weather can make or break an event.
Event organizers need to monitor weather closely in the days and hours leading up to gatherings. Displaying explicit conditions helps vendors and attendees prepare themselves properly with parking and transportation.
As Philadelphia event planner Sarah Hawk notes:
"Weather absolutely plays a role in event planning and execution. We check forecasts beginning 10 days out through the day of the event to ensure proper preparation…"
3. Provides Value for Media and Blogs
Online publishers can also use weather widgets to deliver more engaging content to readers. Local news sites and city resource blogs use weather modules to inform residents about local conditions.
In fact, recent surveys found that 67% of digital media readers access weather-related news and data multiple times per week.
Now that you know the main reasons for adding weather forecasts, let‘s dive into the step-by-step guide for beginners!
How to Easily Add a Weather Forecast in WordPress (5 Simple Steps)
To display weather conditions on a WordPress website, we‘ll use a popular free plugin called Location Weather.
Benefits:
✅ Simple 5-minute setup
✅ Optimized for speed
✅ Customize forecast styling
Let‘s get started…
Step 1: Install and Activate Location Weather Plugin
First, install and activate the Location Weather plugin from the WordPress repository:
[block:image] {"images": [
{
"image": [
"https://www.wpbeginner.com/wp-content/uploads/2021/04/installpluginwordpressbeginner.png"
],
"sizing": "full"
}
] }
[/block]
💡Expert Tip: If you need help with plugin installation, see our step-by-step plugin installation guide.
Step 2: Get Your Free Weather API Key
The Location Weather plugin pulls data from the OpenWeatherMap API.
You‘ll need to grab a free API key to access their weather data. The plugin makes it easy to sign up right from your WordPress dashboard.
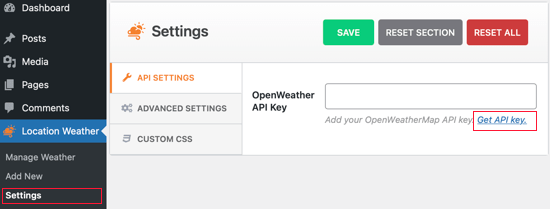
Go to Location Weather » Settings and click Get API key:
[block:image] {"images": [
{
"image": [
"https://www.wpbeginner.com/wp-content/uploads/2021/08/weatherapilink.png"
],
"sizing": "full"
}
] }
[/block]
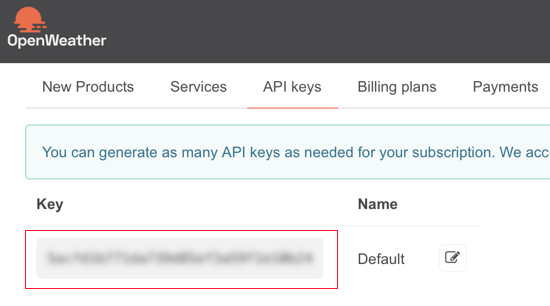
Sign up for OpenWeatherMap, then copy your default API key by going to your account > My API Keys, as shown:
[block:image] {"images": [
{
"image": [
"https://www.wpbeginner.com/wp-content/uploads/2021/08/weatherapikey.png"
],
"sizing": "full"
}
] }
[/block]
Step 3: Configure Your Location Weather Settings
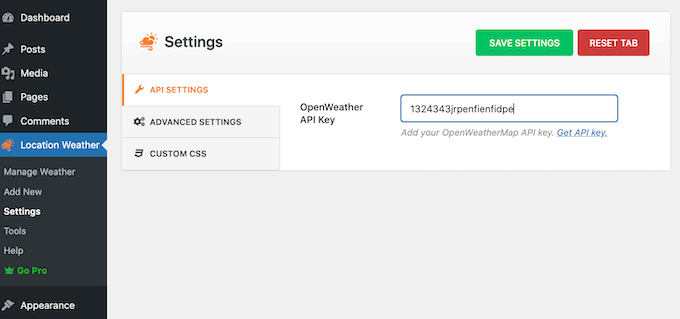
Go back over to your WordPress dashboard and paste your API key into Location Weather‘s settings:
[block:image] {"images": [
{
"image": [
"https://www.wpbeginner.com/wp-content/uploads/2017/11/openweather-api-key.png"
],
"sizing": "full"
}
] }
[/block]
Next, adjust any units, format settings, info types and color customization you want for your weather forecast.
I recommend showing:
☑ Current temperature
☑ Brief text forecast summary
☑ Chance of rain
☑ Wind speed
This displays enough useful weather data without overcrowding your site.
💡Pro Tip: Want multiple locations or a 5-day forecast? The Location Weather Pro premium plugin has advanced options and priority email support.
Step 4: Add Your Weather Forecast to WordPress Pages
When ready, create your first weather forecast by going to Location Weather » Add New:
Give your forecast a title, enter your desired location, select preferred units and setting, then Publish.
You‘ll then get a weather shortcode. Copy this!
Step 5: Display Weather Widget Anywhere on Your Site
Finally, paste your forecast shortcode into any WordPress page, post or widget.
Some common placement ideas:
- sidebar widget
- header banner
- individual posts
- 404 error page
- footer navigation
For details, see our guide on properly adding shortcodes in WordPress.
That‘s it! After adding the [location weather] shortcode, you‘ll instantly display a live weather report.
Location Weather Features Comparison: Free vs Pro
The base Location Weather plugin available from WordPress.org offers a surprising amount given its free price tag.
But advanced users may benefit from upgrading to Location Weather Pro.
Here‘s an overview comparing the free and premium weather plugins:
| Location Weather (Free) | Location Weather Pro | |
|---|---|---|
| Weather API Access | ✅ OpenWeatherMap access | ✅ OpenWeatherMap + more APIs |
| Widgets | Multiple widgets | Multiple widgets |
| Location Targeting | City search | City,postal code,coords |
| Display Conditions | Current weather only | Current + 5-day / 7-day forecast |
| Attribution Link | Mandatory | Optional |
| Design Customization | Basic colors/sizes | Robust styling options |
| Usage Tracking | Basic analytics | Advanced analytics |
| Support Level | Forum support | Priority email support |
| Price | Free | $39 one-time payment |
As you can see, the free Location Weather plugin still packs an impressive amount of functionality.
The premium Pro version mainly adds robust multi-day forecasting and advanced location targeting.
Do You Really Need to Upgrade to Location Weather Pro?
For most users, the free plugin will be perfectly fine, especially just for displaying current weather conditions in WordPress.
But for weather enthusiasts, meteorologists, or tourism platforms needing expansive reporting, the Pro upgrade brings more control and customization.
In any case, I always recommend trying free plugins first before paying for premium add-ons when possible.
Real Website Examples Using Location Weather
To give you ideas and inspiration for weather forecast integration, here are a few examples from real sites:
➡️ Travel Hotel Site
This hotel booking site shows the 5-day forecast, so visitors can evaluate upcoming weather before trip planning:
[block:image] {"images": [
{
"image": [
"https://locationweather.net/wp-content/uploads/2021/03/location-weather-pro-preview-travel-template.png"
],
"sizing": "full"
}
] }
[/block]
➡️ Local News / Blog
This city blog widget displays current conditions so locals can quickly check before going outside:
[block:image] {"images": [
{
"image": [
"https://locationweather.net/wp-content/uploads/2021/03/location-weather-free-preview-local-blog-widget.png"
],
"sizing": "full"
}
] }
[/block]
➡️ Weather Enthusiast Site
Weather geeks can create dedicated forecast reports with custom styling:
[block:image] {"images": [
{
"image": [
"https://locationweather.net/wp-content/uploads/2021/03/location-weather-pro-preview-weather-template.png"
],
"sizing": "full"
}
] }
[/block]
The design flexibility here is nearly endless. Match branding colors, use background images, customize data display, and more.
Expert Tips on Customizing Your Weather Widget
With the basics setup of Location Weather covered, let me share some pro design tips for your weather forecast:
🔎 Show Relevant Forecast Data
Don‘t overload your site! Only display weather stats that matter for your readers.
For example, a mountain blog could show snow accumulation and wind chill, while a beach resort may want to feature humidity and water temperature.
🎨 Style it to Match Your Brand
Make sure to tweak the text, background colors, font styles, and sizing to match your existing site design.
Code custom CSS into Location Weather‘s styling settings rather than overriding theme styles.
🚫 Avoid Visual Clutter
Keep margins, borders and space around your weather widget consistent with other site elements.
Don‘t let the module distract or compete with your main content, images or navigation.
🌡️ Use Unique Data Visualizations
Instead of generic cloud icons, incorporate creative weather representations like:
- Animated rain particle effects
- Wind speed graphs
- Interactive temperature heatmap overlays
Tools like Dark Sky API offer weather visual code snippets.
📈 Optimize Location Targeting
Show weather at multiple pinpointed locations, rather than a general region. Visitors want hyperlocal data.
The Location Weather Pro upgrade can auto-target by IP address or ask users to share their location.
Now you have both the basics plus advanced tips and tricks for displaying weather in WordPress like a pro!
Wrap Up: Add Engaging Weather Reports to WordPress Sites
I hope you found this ultimate step-by-step guide useful for adding weather forecasts into your WordPress site.
As you learned, weather modules drive engagement and conversions by giving visitors relevant planning context.
Tools like the Location Weather plugin make setup fast and easy. And you can start with free features, then upgrade later if needed.
To quickly recap, we covered:
✔️ Top examples of websites that benefit from weather forecasts
✔️ Full step-by-step installation and configuration walkthrough
✔️ Location Weather free vs pro comparison
✔️ Real site examples and creative design ideas
✔️ Pro tips for customizing and optimizing weather widgets
Do you have any other questions about displaying weather conditions on a WordPress site? Ask me below!

