MACs are one of the most used devices in the world. Their powerful performance and beautiful design have made it a preferred choice for many, mostly amongst the younger demography.
So, in this article, we shall give you a step-by-step guide to set up a VPN on MAC. Read on.
Get a VPN subscription
The first prerequisite for setting up a VPN is getting a VPN subscription. There are several VPN service providers present on the internet to provide you with VPN service. You can choose a fast and reliable VPN service provider like Hide My Ass and ExpressVPN (Top ranked on prywatnoscwsieci for Poland internet users.)
Alternatively, you can also choose various free alternatives to establish a VPN connection. However, free service providers may not be as reliable and efficient as paid ones. Further, there are speed limits, data caps, and time-per-day limits which may ruin your internet experience.
Once you choose a VPN service, get the following credentials from them:
- Server IP address
- Username and password
- Type of protocol (i.e. PPTP, P2TP, or OpenVPN)
After obtaining the above info, move onto the next step.
Set up a VPN on MAC
Follow the procedures given below to set up a VPN on your MAC OS X.
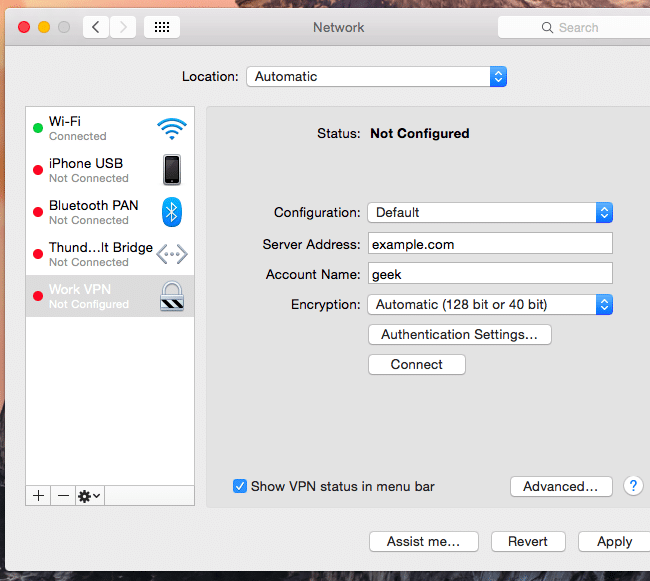
- Go to “System Preference”
- Select “Network”
- Then, click on the “+” symbol present at the bottom left of the screen.
- Choose “VPN” and specify the VPN protocol that you’ll be using.
- Select “Configuration”
- Choose “Add Configuration” put the name as per your wishes.
- Now, in the given column, enter the IP address and the username that you obtained from your VPN Service provider.
- Now, select “Authentication Settings” and enter the password (as obtained from your Service provider)
- Select “Show VPN status in the menu bar”
- Click on “Apply”.
- Now, notice that you have a new icon (a luggage tag) on your menu bar.
- Click the icon and select “Connect VPN”.
A timer starts running as soon as you are connected to the VPN. This means that you’ve successfully connected your MAC to a VPN!
Additional Settings
The default settings on macs allow only necessary traffic through the VPN connection. This allows the system to maintain the speed of the internet for other operations. This is done so as that the entire experience of your internet is not spoilt because of the slow VPN speed and only a few services use VPN to connect to the internet.
However, if you wish to tunnel all your traffic through the VPN connection then follow the following steps:
- Go to “System Preferences”
- Choose “Advanced”
- You will notice an option to “Send all traffic over VPN connection”.
- Now, choose “set service order” from the drop-down options.
- Now, drag “VPN” to the top of the list.
By dragging VPN to the top, you have allowed all your traffic to be routed through VPN. Now, every request you make will be tunneled through the VPN server itself. Now, sit back and enjoy unrestricted internet on your Mac!
Conclusion
Macs occupy a significant portion of the computers’ market. Hackers target such popular device to gain access to your private information. Hence, it becomes essential to refer to privacycritic that the users take care of their anonymity and privacy while surfing the internet.
This is where the role of VPNs comes into the picture. Setting up a VPN on an MAC is quite simple. Simply follow the instructions given above to successfully set up a VPN on Mac OS X and enjoy the internet, the way it should be enjoyed.


