Do you want to invert the Color of iPhone to keep your eyes safe? Then come on and learn how to invert colour on the iPhone gadgets. This is a critical aspect but let us find out how to do it in our article.
iPhone is the trending mobile makes on the market today. The device comes with one of the best configuration options, which makes it perfect for any user. Therefore, anytime you feel like the screen is hurting, you can easily change the background color. When you are stuck, we have a solution for your problem today.
The world is transforming faster, and people are often operating different tools that bring about eye problems. The best option to start with is to try the color inversion option as an iPhone user when you experience difficulties while working with your phone. You can tackle your issue easily using this feature.
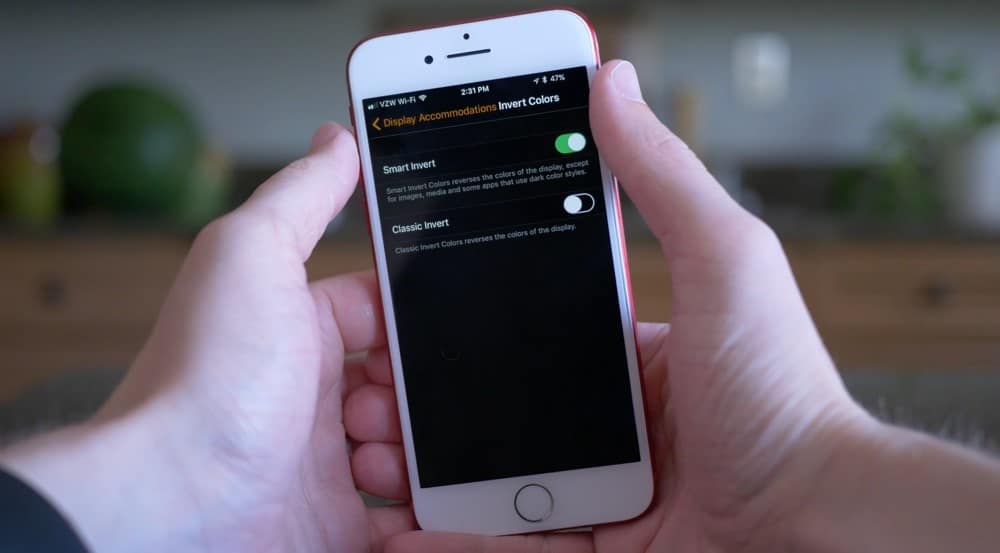
Today's article will guide you on how to invert colors on iPhone and also cover some of the essential aspects and areas we want you to know. But, before we go into details about how to invert color on iPhone, let's see the benefits of color inversion.
Why Invert Colors on a Picture?
The color invert feature on iPhone is significant. And there are various situations when it matters to use it. Some of the reasons are:-
- At one point, you might need to reverse a black and white photo online so that you can access small and hidden details when the image is too light. For such a situation, you can flip your image without wasting time and find the details in no time but with needed precision. This is why the invert feature is becoming popular, especially when you are among the impaired eyesight person.
- You re are that any scanned file is taken as a tiff file having a negative image. Therefore, photographers use this feature to invert such images and determine the final expectations on how they should appear. Also, the feature is very vital for professional photographers that are working with traditional films.
- Another situation where this feature plays a part is when you use the iPhone in a dark room. Though you can use the phone often, you should invert the images on the iPhone so that your eyes cannot look bad. Thus, play it smart always.
- Inverting color on iPhone is also essential because e the process saves your battery life other than offering protection to your eyes.
How to Invert Colors on a Picture on iPhone?
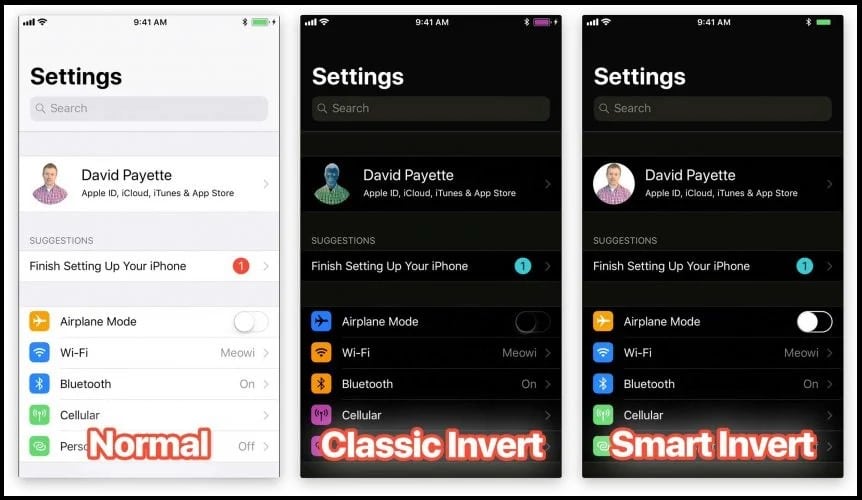
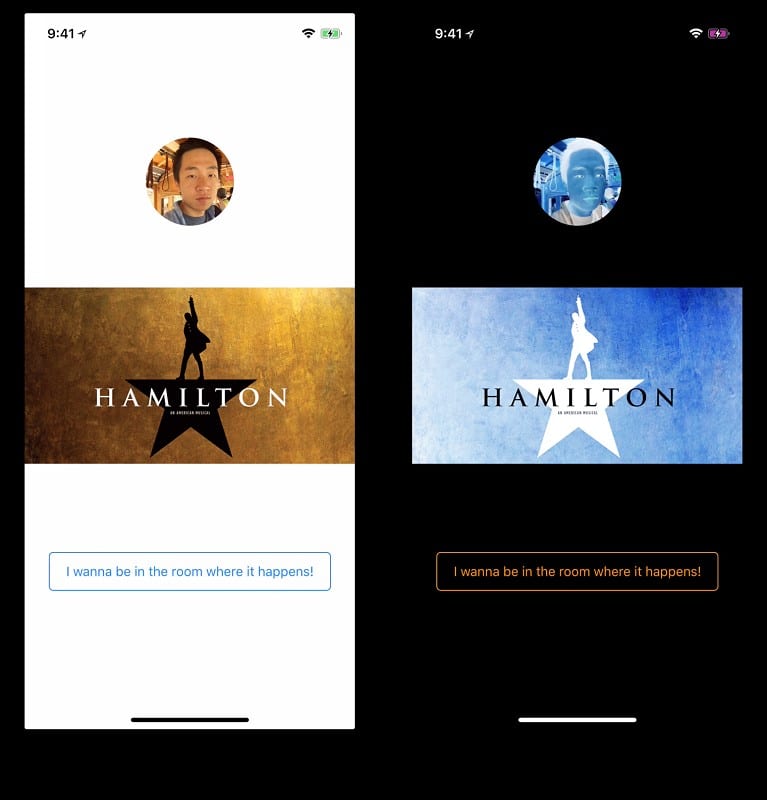
This section will take you through the procedure to change your iPhone's color. However, it would be best if you start by understanding the difference between smart and classic invert. A smart invert reverses all screen colors, excluding the images and other media contents such as videos and other apps that might end up with a dark interface.
iPhone has an inbuilt feature that facilitates the whole process. However, follow the below procedure to invert color on the iPhone: generally
Step 1: Open the Settings application on your iPhone gadget
Step 2: then screen down on the menu and locate accessibility
Step 3: Then while on the accessibility section, navigate down and locate the display and text size option from the menu once you click on it, you will be redirected to the advanced options.
Step 4: Therefore, scroll, and from the menu, you can locate classic or smart inverts.
Step 5: Select from the two options and once you have decided on which one works well, toggle it to turn on and proceed to enjoy the inverted color on your iPhone.
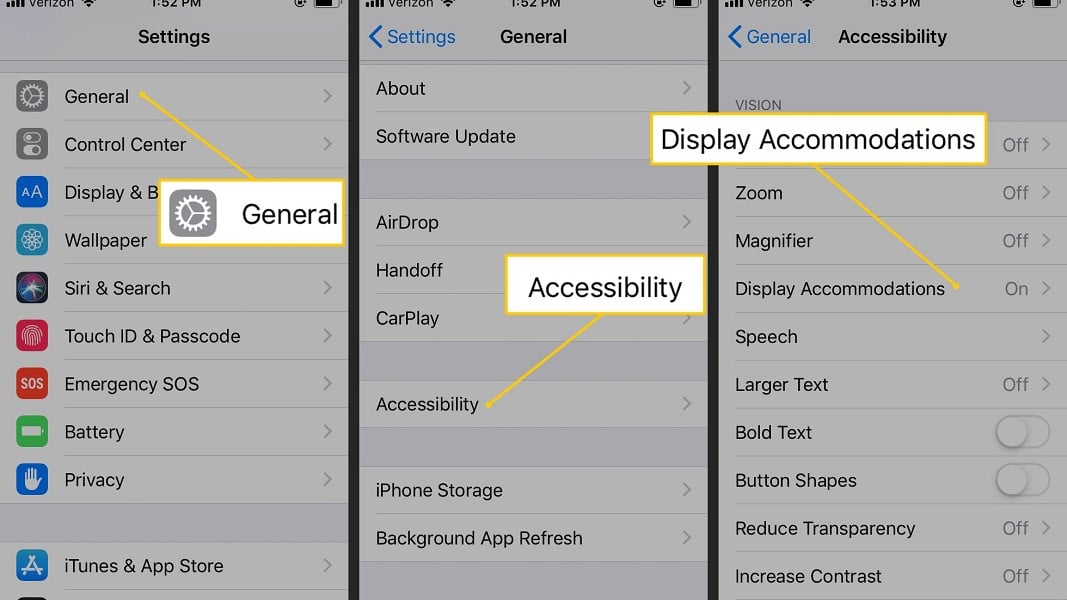
The above steps on inverting color on iPhone are only applications on the latest iPhone versions. But with the older iPhone, the steps are somehow unique. But iPhone offers you two ways to invert the color of the interface or images.
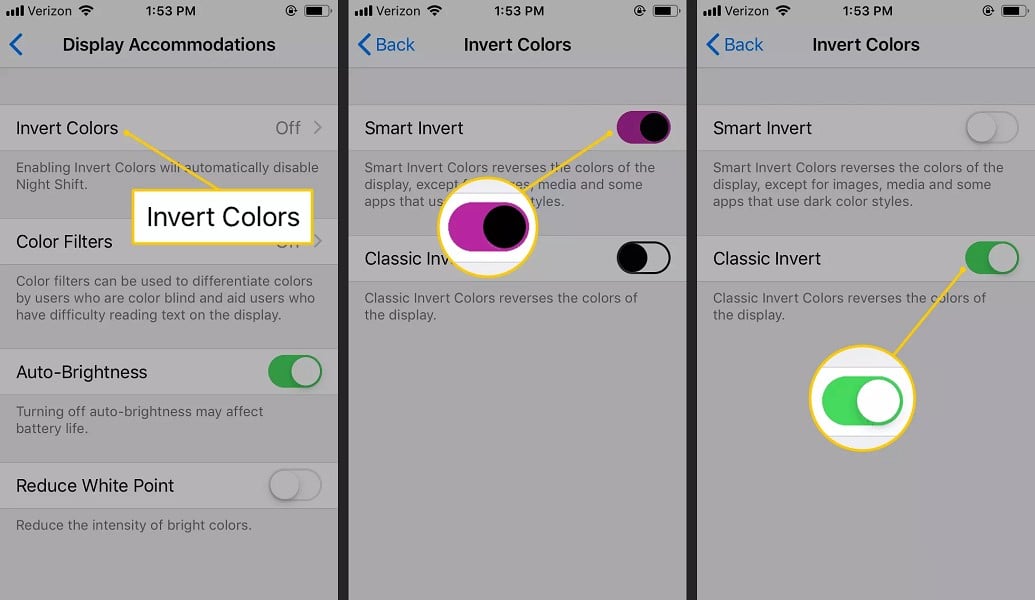
Here is how to go about it:
Step 1: Launch the Settings application on your gadget.
Step 2: Click on the general options from the menu.
Step 3: After that, locate the accessibility from the resulting menu,
Step 4: Navigate through and find the ‘invert color’ options. Tap on it to toggle the settings so that it turns on.
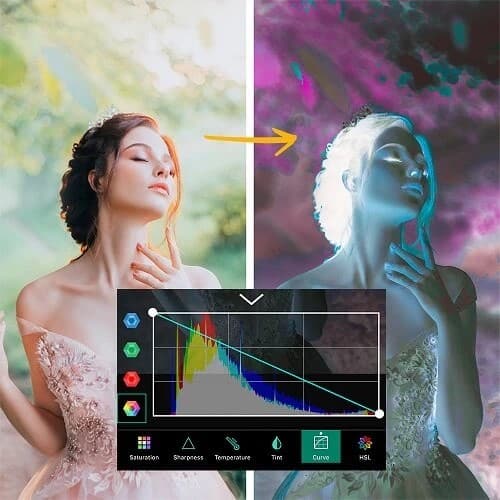
When we say older iPhone version, we refer to the phone in the line below iPhone x. The phone has a physical home button to rely on. But the above steps are slightly different when you compare them with the newer version of iPhones. Once you toggle the invert color button, the invert functions become activated.
How to Set Smart or Classic Invert as an Accessibility Shortcut
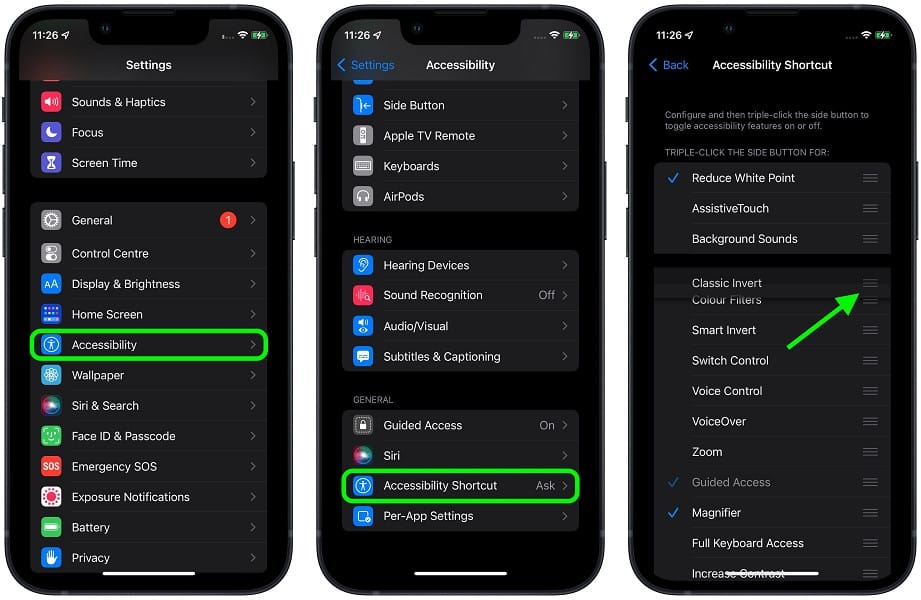
another option that is vital in inverting colour on iPhone is the use of the accessibility shortcut. To this extent, we are of a similar opinion that you understand how to invert colour on pictures. You know that it is technical to toggle the invert function on and off often. Digging through the settings and following the process to reach accessibility is annoying.
However, with accessibility shortcuts, things are more straightforward. Here, we will have two scenarios. The first one is setting the classic or smart color invert on accessibility shortcuts using older iPhone models.
You can make work easy with an old iPhone and invert color quickly. You have to set the invert color function accessible using a shortcut and reach it with only one click.
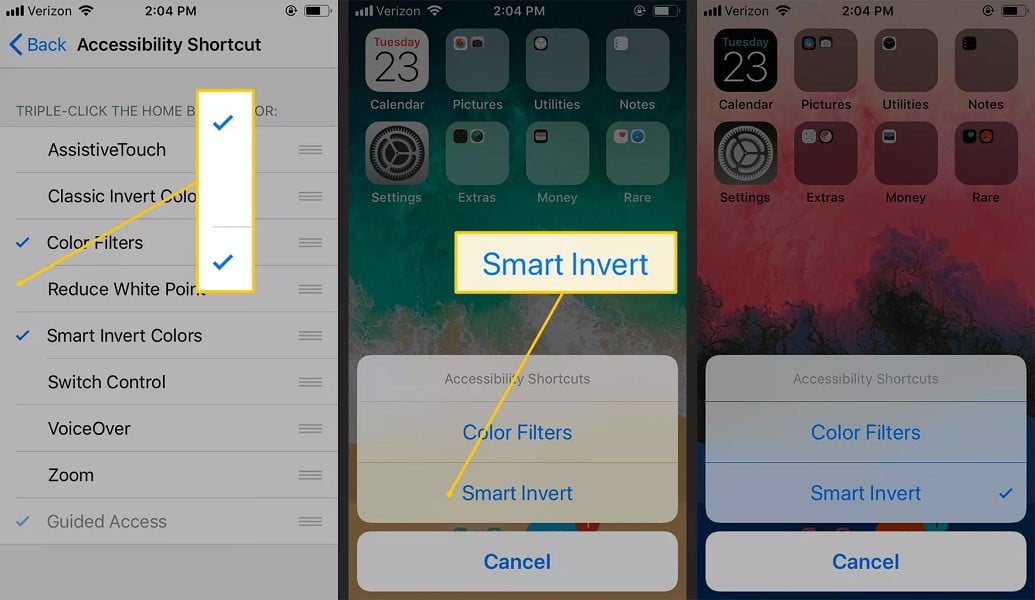
here is the relevant procedure you can follow:
Step 1: have your device launch the settings application,
Step 2: then keep scrolling down until you locate the general form the option and tap on it.
Step 3: Then locate the accessibility from there and click on it
Step 4: Again keep scrolling from the resulting menu and find the accessibility shortcut; tap on it.
Step 5: Once you click on it, the option will redirect you to the advanced options, from which you must then select the ‘invert color.’
Following the above procedure, you should have successfully set the color invert shortcut functions. Therefore, you can still activate it by triple-click on the home button. Thus, you can easily access the function with no extra processes needed.
iPhone X and later lineups have different features. But with the newer iPhone models, the process is slightly different. First, the new version does not have the home button as opposed to the old models.
Thus, if you fall a victim, follow these steps to set the invert color function using the accessibility shortcut:-
Step 1: as standard, launch settings apps on the gadget
Step 2: Then scroll downwards and, locate the general option, click on it.
Step 3: and down on the general page on the down menu, click on the accessibility
Step 4: Keep scrolling on the interface to the end, and tap on the accessibility shortcut
Step 5: Then, you will find another advanced option, including inverting color. Select it, and you will be done.
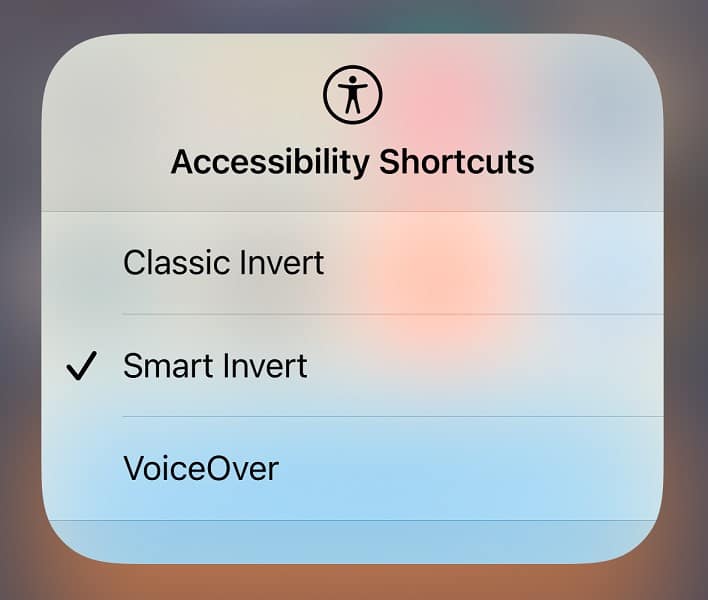
Now that you have set the inverted color, you can access it anytime. However, when you want to activate it, you must triple-tap the side button, and the invert color function will be active on your new iPhone models.
How to Invert Image Colors on iPhone with Third-Party Apps?
While there are many options to invert color on your iPhone, the last option we can highlight in this article is using a third-party application. The apps are effective in inverting color as well on your iPhone.
Many apps are helpful in different ways and generally offer solutions when you want to make your photo negative. Most third-party applications include Negative Me, Negative Image, and Negative Photo; Therefore, we would prefer to use Negative with these at hand. Me for this illustration.
When you hear about negative.me, it does not only invert color but is also effective in editing photos. We selected it for this guide because it is efficient in inverting, especially when targeting recent photos. Besides, you can count on this app for color correction and brightness adjustment.
Here are some simple steps to follow to invert an image color on your iPhone using the Negative. me application:
Step 1: The first thing is to download the application Negative. Me from the app store and install it on your iPhone.
Step 2: After that, launch the application and tap on the plus ‘+' icon, which is found in the upper left corner of your iPhone screen.
Step 3: Then tap on the ‘choose photo' option from the menu and upload the image you want to invert color.
Step 4: Then click on the icon' export' from the right corner of your screen.
Step 5: When you are done, click on the save image, and you will see the changes in the color of the inverted image.
Invert Mode Vs. Dark Mode
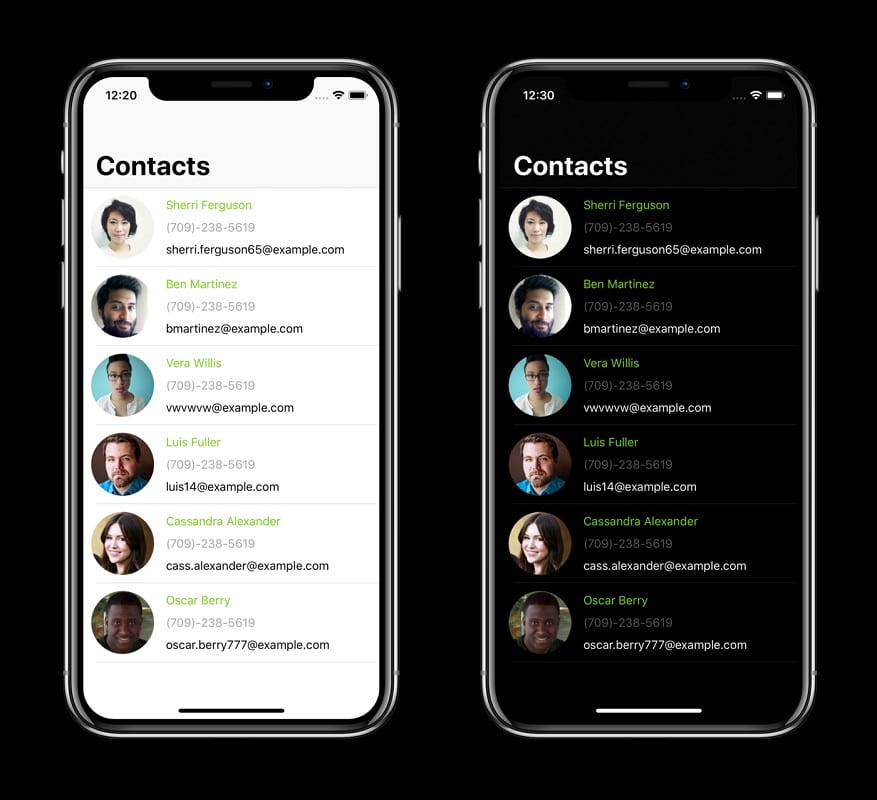
To this far, you now have a rough hint about the inverted color on the iPhone, specifically photos. However, when it comes to dark mode, this is a feature available on multiple operating systems and apps. Therefore, the feature is responsible for changing the interface color of any iPhone model when it’s bright to become dark mode.
The process of changing the color can also be achieved through manual methods. But on some devices, the process depends on the ambient light during the day. Hence, dark mode is often sued at night when dealing with harm to the eyes.
While elsewhere, the invert color process involves changing the background color and the image or media associated instead of the dark mode. This process is essential in inverting a photo on iPhone. Therefore, two scenarios involve classic and smart invert.
Therefore, a smart invert only changes the interface's color, which achieves the same result as the dark mode on the iPhone. But when you use classic invert, it changes the video's color, images, and the user's interface. It is good to understand the two differences.
Conclusion
If you have been wondering how to invert color on your iPhone, now have the solution at your fingertips. In the article, we have taken you through various methods and detailed procedures for inverting color on your iPhone. We have also covered the same processes using the old and new iPhone models. Still, the shortcut and third-party methods are other reliable methods to invert color.
Therefore, go through the above procedure and understand the difference between invert color functionality and dark mode. Then put them into practice to keep your eyes safe and perform different tasks with this feature.


