
Since April every publisher or even a blogger can now publish their own Facebook Instant Article. This blog post will explain what an Instant Article is and the reasons why each marketer should start posting them. I will also go step-by-step through the set-up and submission procedure to get your first Facebook Instant Article live.
What is a Facebook Instant Article?
Early in 2016, Facebook has introduced a new format of news articles on its platform called Instant Articles. It’s not only a new format but also a new user mobile experience (articles are opened on mobile only right now). The main idea of the articles is to open “instantly” with a very short page load time (less than 2 seconds) and a clean, flawless reading experience on your smartphone. The articles are hosted in Facebook, thus the reader does not have to wait to get redirected to an external platform.
What does this mean for marketers? Few things:
- Facebook shift to being more news-based medium focused on trending topics and quality content
- Mobile traffic and user experience is more important desktop
- Facebook makes it more difficult for your followers to get to “your” website, blog etc. as everything is now hosted in Facebook.
- New advertising formats within new Facebook Instant Article platform – check this recent article for demos
- When writing blog posts, marketers will need to make sure they are “Google AMP friendly” which simultaneously means they will be also suitable for Instant Articles.
How to Publish a Facebook Instant Article?
One important note before you’ll start thinking about the articles – this is not going to be your next traditional Facebook post. You will need to go through a series of steps and modifications as well as an up to 5 days review process by the Facebook team. Therefore, if you think you can publish an article today, it will take at least a week.
1What you need before you start
What you need before you start
- If you’re using WordPress as your CMS, make sure you install this plugin. Although Facebook does offer their own Instant Articles plugin, I highly recommend PageFrog – it’s easier to use and sets a lot of things for you already.
- Minimum of 50 articles on your blog and 10 to submit to Facebook.
- Facebook Business Manager in case you want to monetize the articles or have questions to customer support.
- Facebook Pages Manager mobile app (see both iOS and Android versions) as you will need to preview the articles on your mobile.
2Sign up for Facebook Instant Articles
Sign up for Facebook Instant Articles
When logged in Facebook, go to this website to sign up for Instant Articles. Facebook will ask you to choose a specific Facebook page and agree with their terms and conditions.
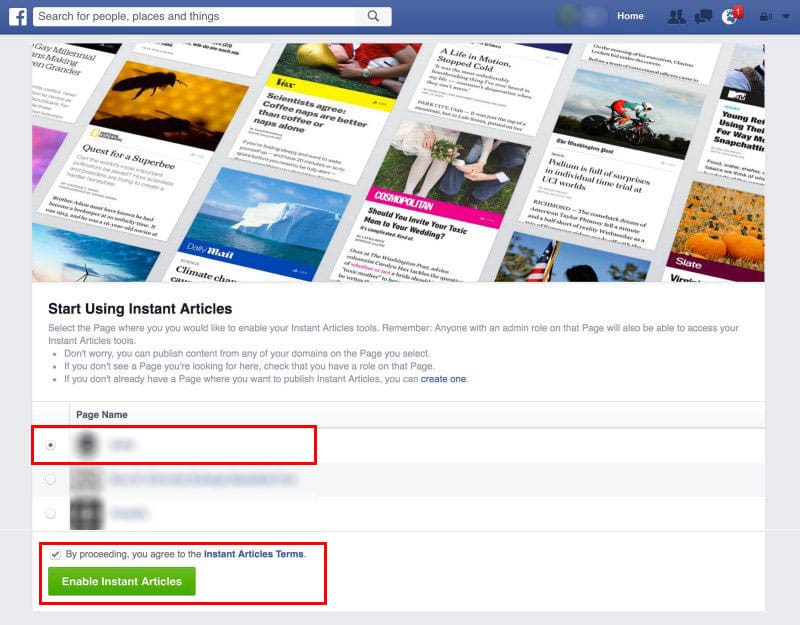
Now, you will be redirected to this screen within your Facebook dashboard:
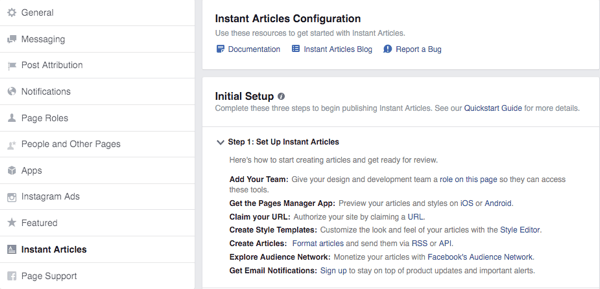
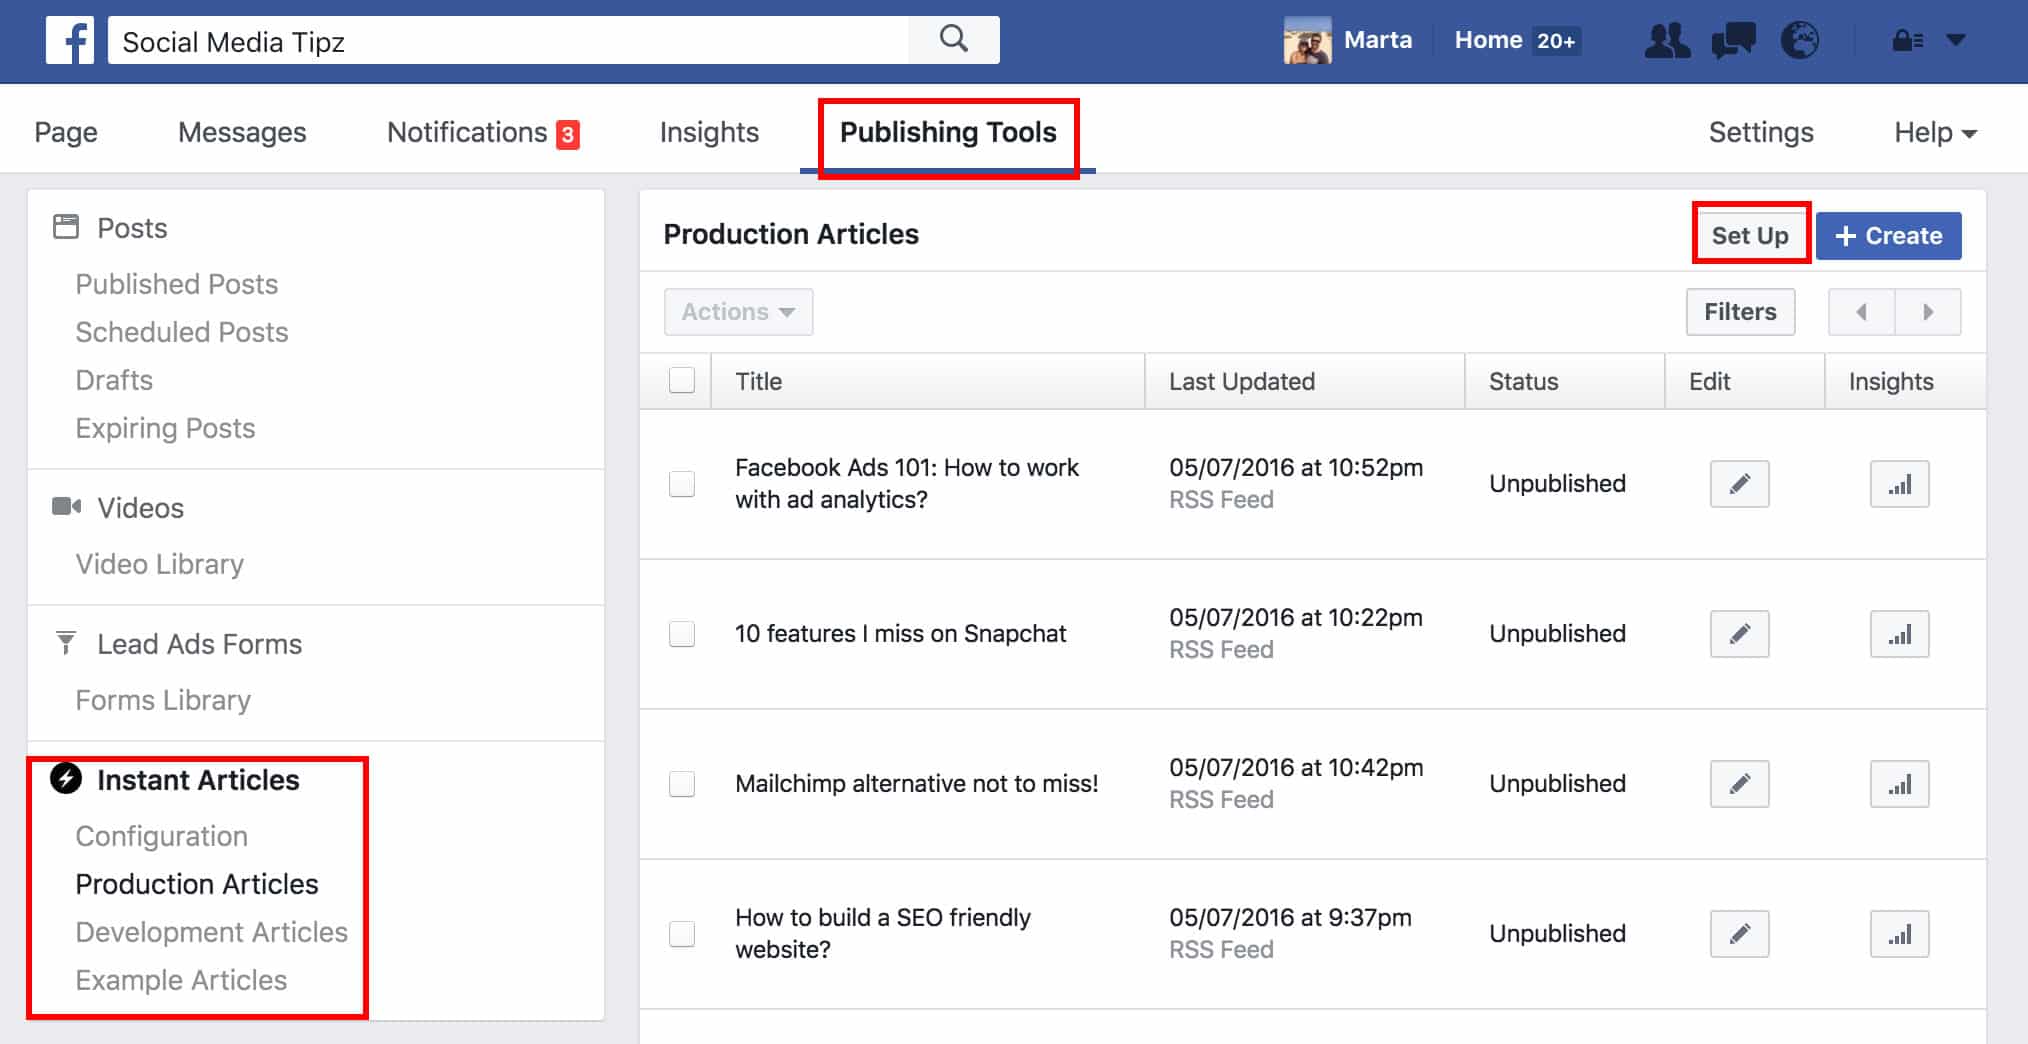
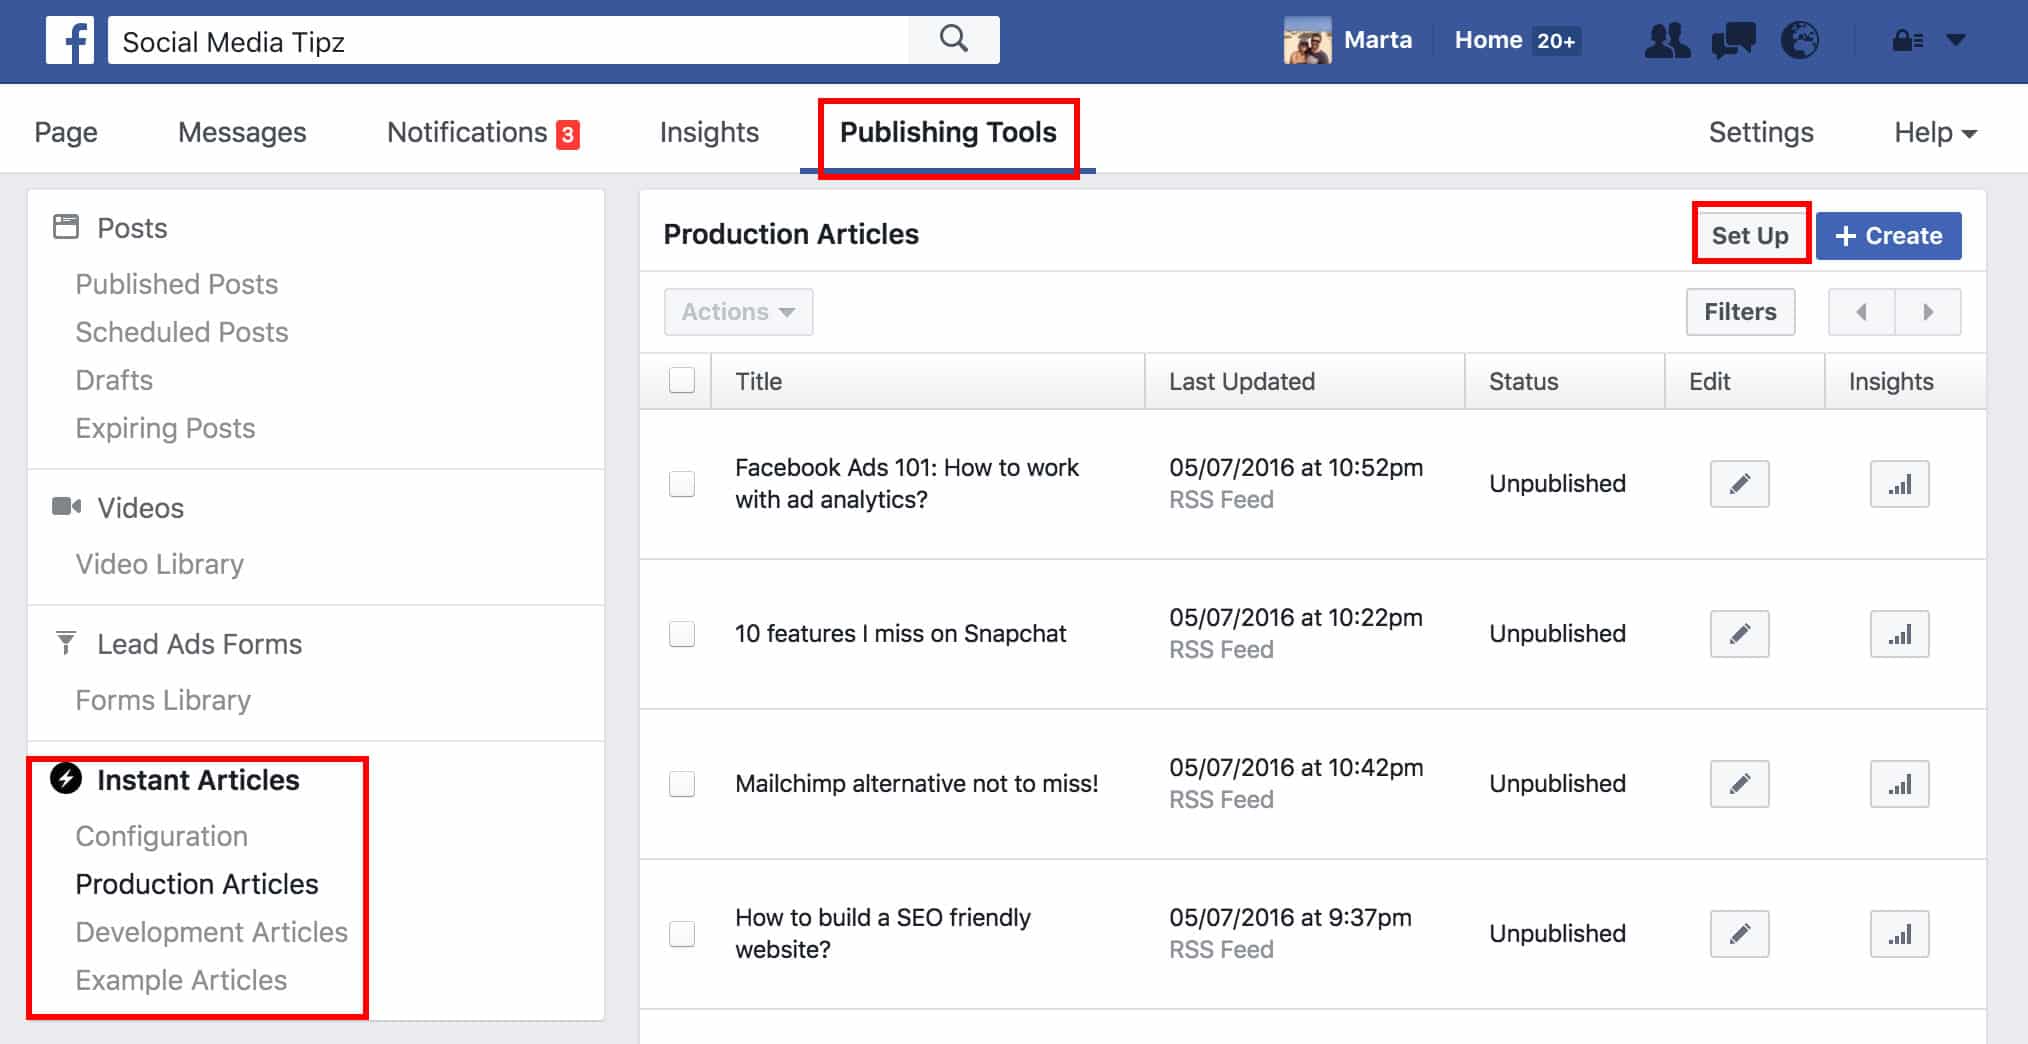
You can always access this screen by going to Publishing Tools and on the left side, you will see a section called Instant Articles.
3Follow the steps in Initial Setup window
Follow the steps in Initial Setup window
Make sure you’ve ticked each of the steps, e.g. you downloaded the Facebook Pages Manager app. An important step is to claim your website url, which is simply authorizing it with Facebook (just like e.g. Pinterest does).
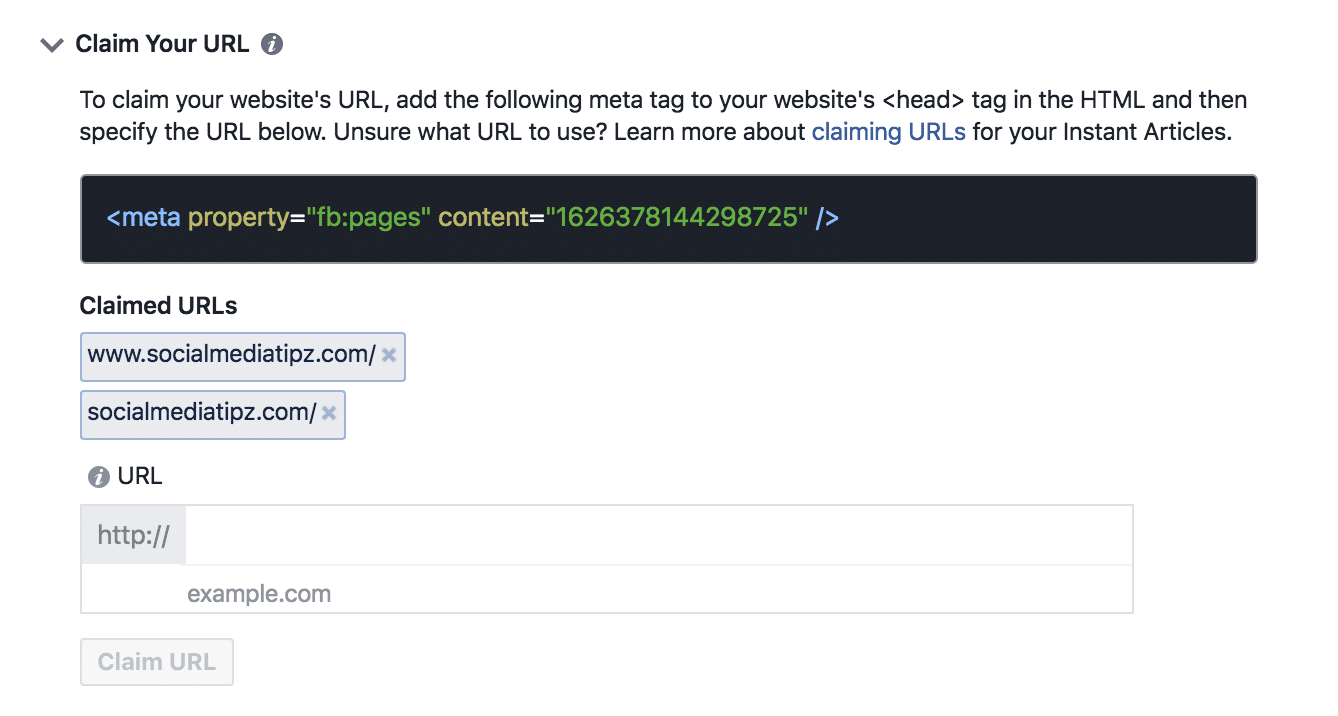
First, copy the piece of code you see on your screen (every page gets its own meta tag) and paste it in the header of your website HTML code. If you can do it on your own, make sure it’s between <head> tags, otherwise ask your developer to help you.
Next, you will need to specify which URL to claim. Note, Facebook doesn’t do this automatically but instead it asks you as to which domain will be used specifically for Instant Articles. You have 3 choices and the domains are case sensitive.
Choosing a URL at this stage simply defines which articles will ultimately be eligible to become Instant Articles. At a later point, you can choose which to publish as Instant Articles.
Make sure you choose the right domains! If you struggle, visit this helpful article from Facebook Developers forum.
4Styling
Styling
Click to Style Editor to add your own styles of how the articles will look like. There is a default option installed already, however you might want to brand your articles, by e.g. adding a logo on top of the article. Tip: my articles weren’t accepted at beginning due to lack of brading on the article template, so I had to create one.
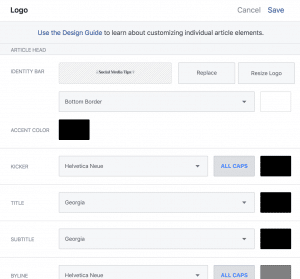
There are more ideas as to how you can customize your article – read the guide here.
5Set up your RSS feed
Set up your RSS feed
This option is to ensure your published articles are automatically fed into Instant Articles. Facebook gives you two options – production feed (the main RSS feed of your blog) or a developmental RSS feed that only you see for testing purposes. For dummies like me, I’d just stick to the production feed. However, if you want to first see how Instant Articles work and look like, I’d suggest going for the development RSS feed first.
This is where your plugin will come handy. As I mentioned before, I used PageFrog to set my RSS feed.
Once the plugin is installed, go to Mobile Insights section in your left hand side bar in WordPress. You will see this window:
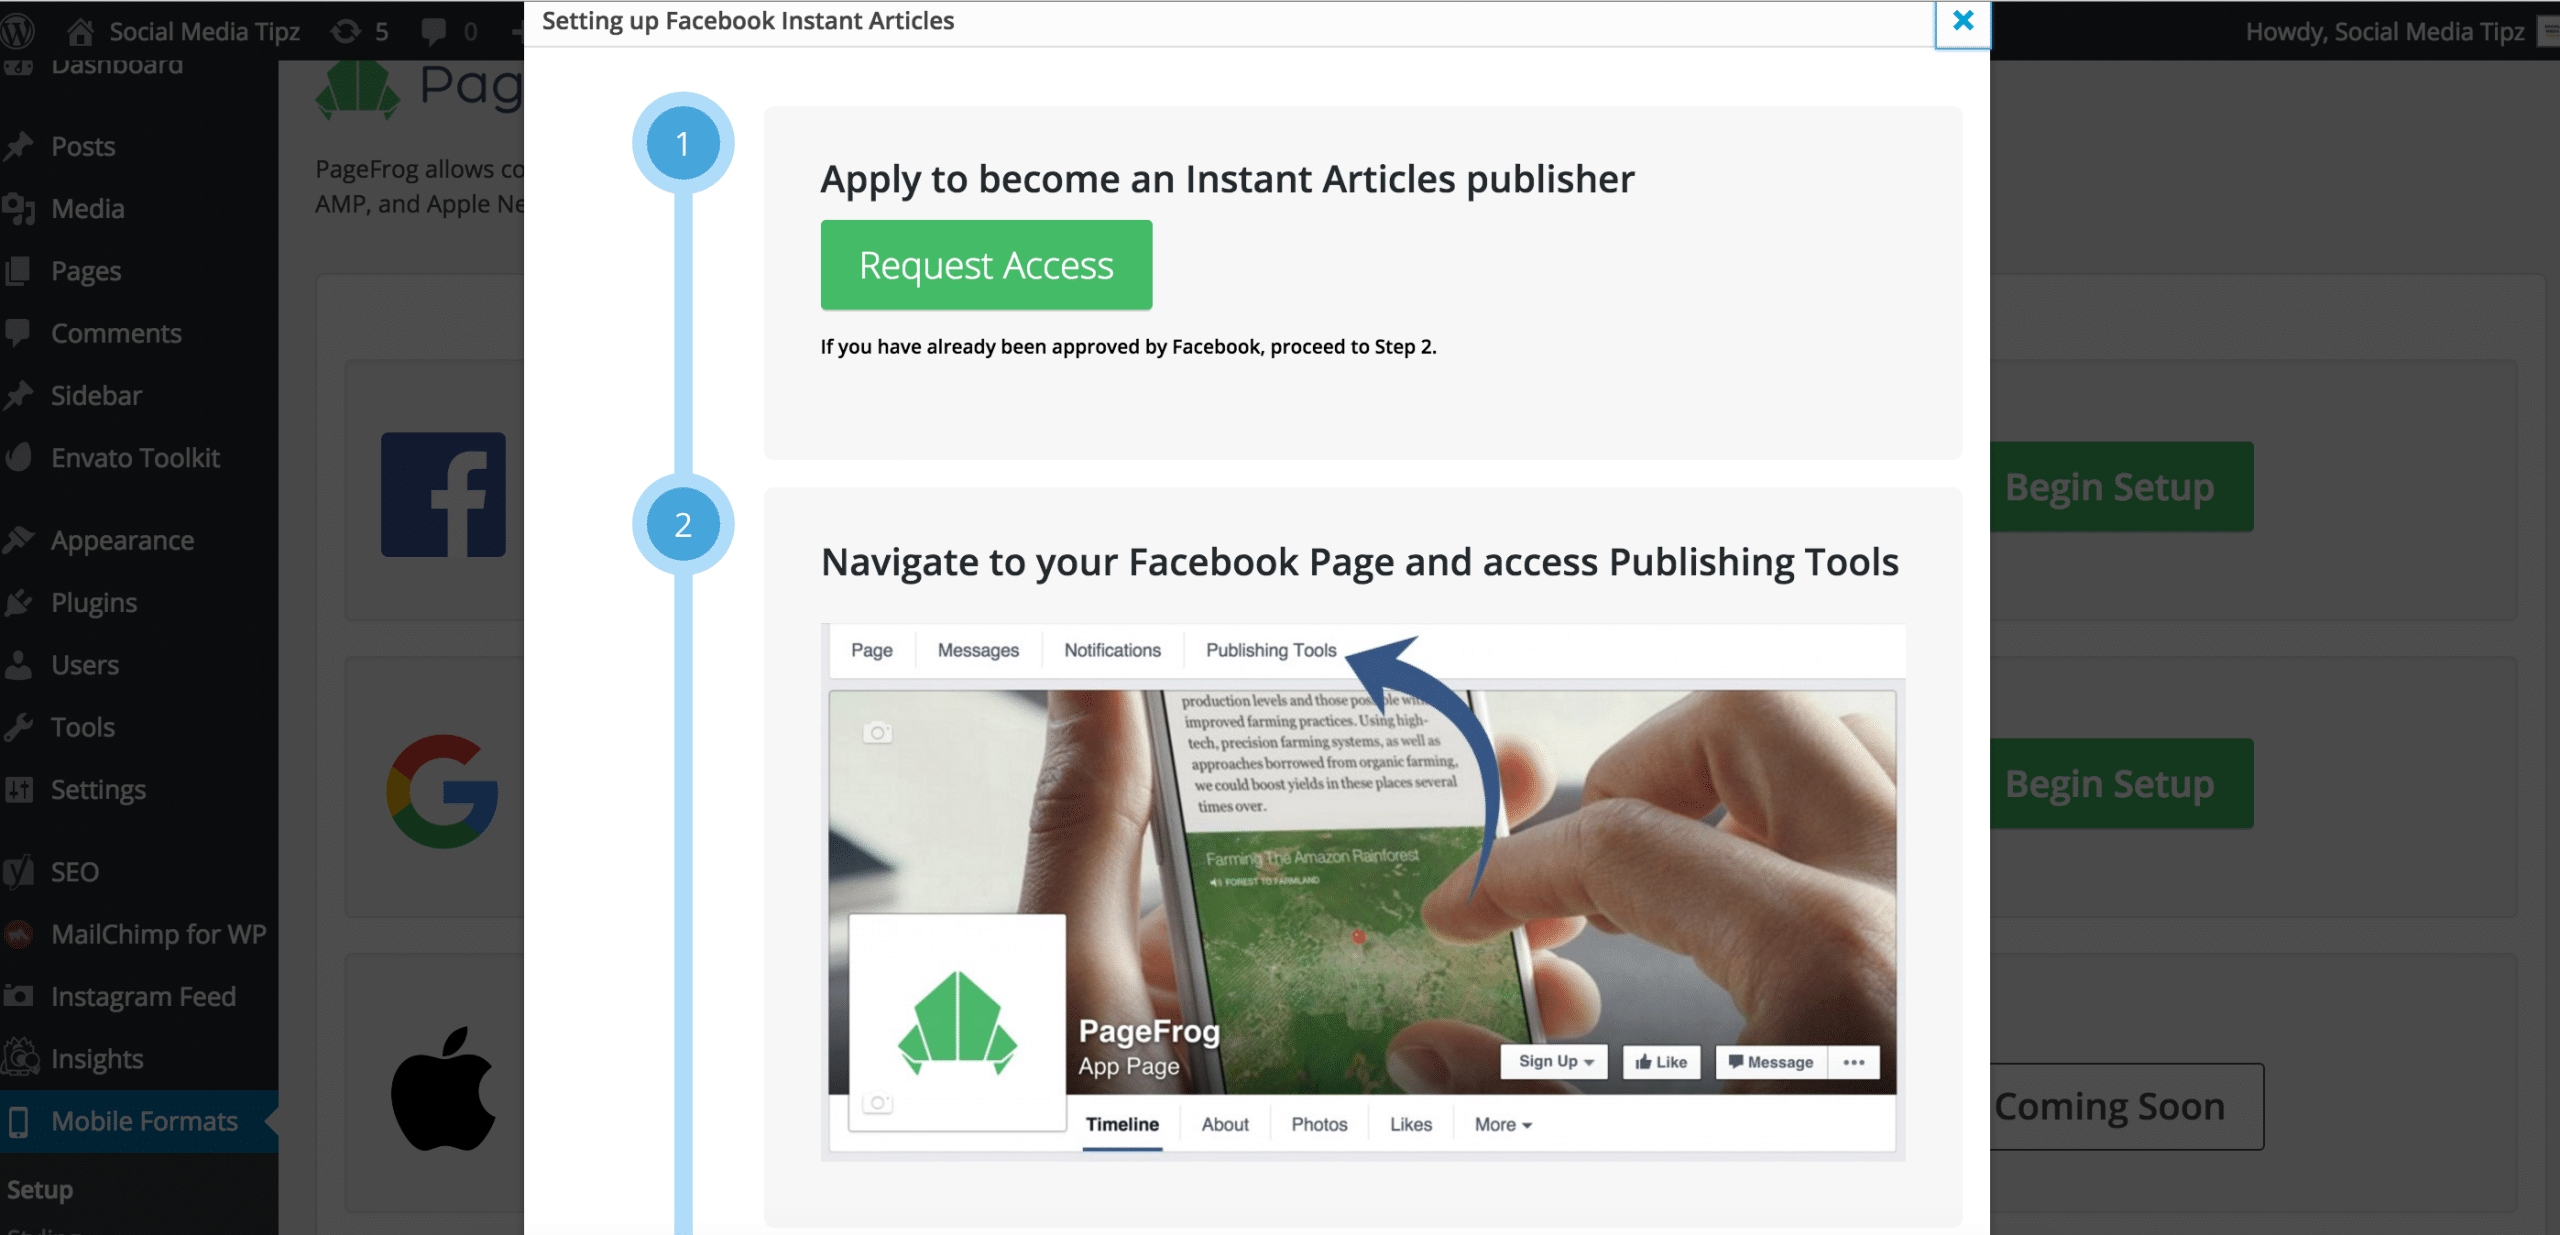
PageFrog will ask you to copy the code and paste it back in Production RSS feed in Facebook:
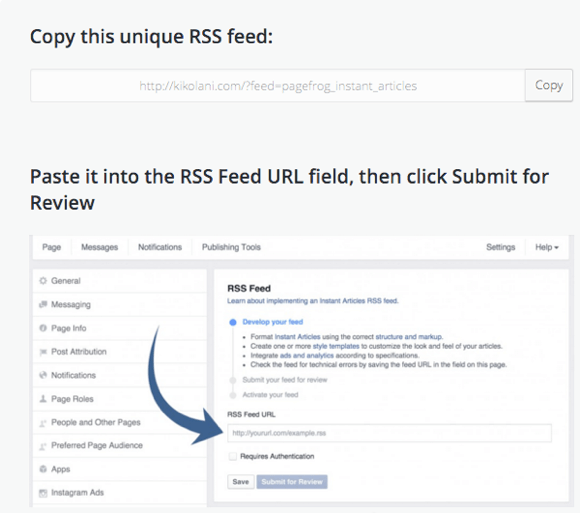
Once your RSS feed has been approved and you activate your feed, all new articles received from your RSS feed will automatically appear in Instant Article form when you share them on your Page. If you want to disable automatic publishing, turn on draft mode. In draft mode, all new stories received from your RSS feed are stored in your library as unpublished Instant Articles until you manually publish them through your Page admin dashboard.
6Set up article monetization & email settings
Set up article monetization & email settings
In case you want to monetize your articles, you will first need to agree to terms and conditions. After you get started, you will need to create an account on Audience Network, create ad placement, modify your code and finally – insert ads in your articles. This will help you earn money with the ads that are displayed in your content. Remember, you need Business Manager for that.

If you’d like to get notified via email about the set up of your articles, this is the place to mention it. You can also receive notifications from the official blog. Tip: make sure your email notifications settings are turned on.

7Create or modify 10 articles
Create or modify 10 articles
This is where the your RSS feed comes handy – your exisitng articles are loaded and the only thing you need to do is check for any errors (if you get notifications) and eventually, check for design (this is where Style Editor is useful as well as the previews in Facebook Pages Manager app).
If there is an orange icon next to your article, you can open it up and Facebook will show you (in orange) what is wrong. Unfortunately, your article is shown in a HTML code form as well as the error. This means you need some HTML skills to figure out the errors. The best way is to fix it in the article itself – e.g. missing images or wrong headlines. Once the article is refreshed in Facebook, the error should disappear.
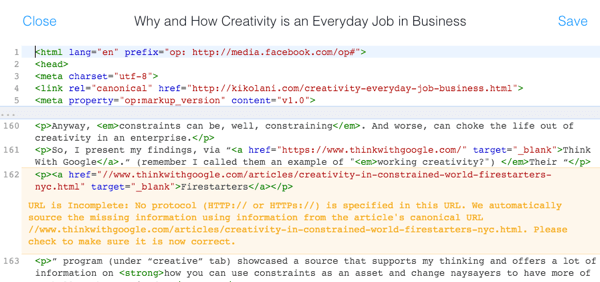
If you want to preview your article before it goes live, use the Facebook Pages Manager app:
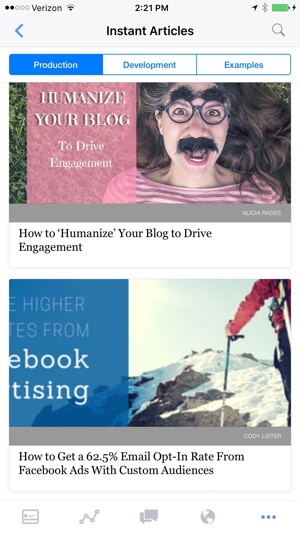
See some of the example instant articles from Facebook.
8Submit 10 articles to Facebook
Submit 10 articles to Facebook
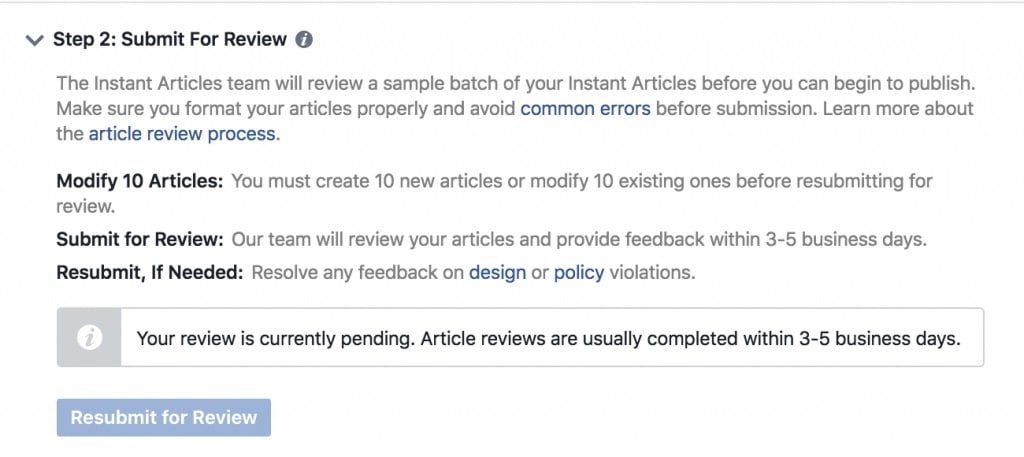
Step 2 in the Facebook Initial Setup window is to submit your 10 ready articles for review. In this case, Facebook team takes up to 5 working days to go through your content and approve it. Mine was not accepted at the first time, however I got feedback points on what needs to be fixed (together with screenshots). After improving the design and minor technical errors, you can resubmit articles:
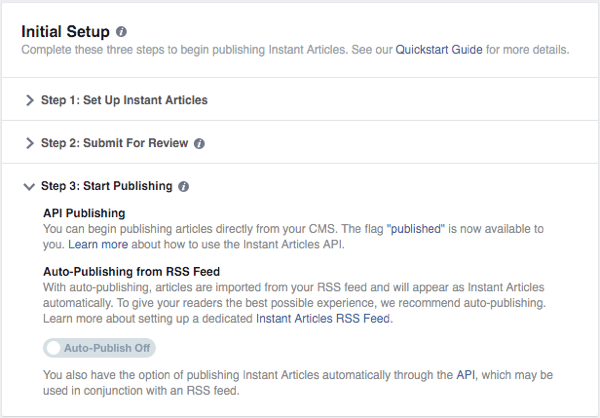
After your articles are approved, you can tell Facebook to automatically publish Instant Articles once you publish your own blog post or news (as they’re connected via RSS or API).
By accessing Instant Articles section in Publishing Tools, you can choose which article needs to be modified or switched off completely. You also get access to Instant Articles analytics.

If you’ve asked to place ads in your content, with Business Manager you’re able to see how the monetization performs.
Share it with those who might be interested in publishing Facebook Instant Articles. Remember – if you start early, your organic reach will be much higher!


