An L2TP/IPsec VPN failure on windows 10 is usually due to a misplaced or misconfigured certificate. The L2TP connection can face failures due to a security layer facing a processing error during the initial run.
Ever since Windows users started using VPN services in huge numbers, many people have reported issues with their providers, mostly related to VPN protocols. These connection errors related to VPNs on Windows can have several causes, ranging from major to minor. As expected, these errors are mostly associated with lesser-known or dubious free VPN services.
You may also encounter these errors due to incorrect settings of your VPN connection, or using a lousy free VPN service. To quickly fix this issue, it’s advised to use experts’ recommended best free VPN for windows.
If the issue persists, you may have to tweak your network settings. You see, incorrect connection settings can have various reasons. For example, you may have entered inaccurate server addresses or you used the wrong name, username, and password. In order to troubleshoot VPN connection problems, first of all you must verify whether you’ve entered the correct information.
If you have Windows 10, sometimes, your connection will show an LPTP/IPsec VPN not connect error on windows 10 error. This article contains information on how to fix this error..
Use a Command Prompt
The following steps can be taken to fix the error using a command prompt.
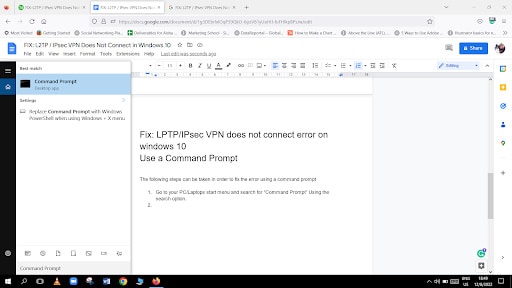
1. Go to your PC/Laptops start menu and search for “Command Prompt” Using the Search option

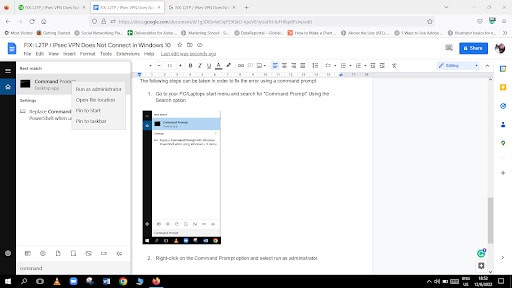
2. Right-click on the Command Prompt option and select run as administrator.
3. Open the Command Prompt in elevated mode using the run as administrator option.
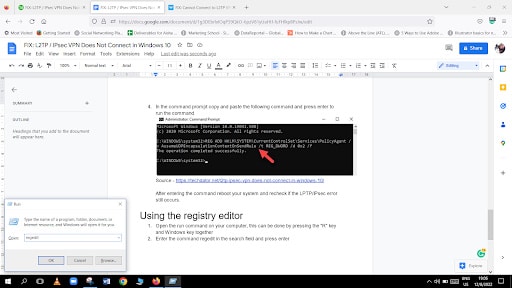
4. In the command prompt, copy and paste the following command and press enter to run the command.

After entering the command, reboot your system and recheck if the LPTP/IPsec error still occurs.
Using the registry editor
1. Open the run command on your computer. The run command can be opened by pressing the “R” and the Windows keys together.
2. Enter the command regedit in the search field and press enter

3. In the registry editor, go to the option – HKEY_LOCAL_MACHINE\SYSTEM\CurrentControlSet\Services\PolicyAgent
Right-click the option “Display Name,” and right-click the option New.
4. Select the option DWORD-32 Bits and rename it as
AssumeUDPEncapsulationContextOnSendRule
5. Now double-click on the newly created directory named “” In the newly opened pop-up,
set the value 2 in the value set.
6. Pasting the new command HKEY_LOCAL_MACHINE\SYSTEM\CurrentControlSet\Services\RasMan in the address bar of the Registry Editor. Right-click on a space on the newly opened registry and select the New option.
7. Select the DWORD – 32-bit option and rename it to ProhibitIpSec
8. Now open the option named ProhibitIpSecand change the value set option to 0 and click ok.
Close down all the windows and restart your computer. Recheck if your VPN is connected or not.
IPsec Service restart
1. Click on your start menu.
2. On the search options, search “Services.”

3. Click on the services option, and open the service window.
4. In the service option, click the “Names” option and then find the IPsec Policy agentoption.
5. Right-click the IPsec policy agent option and click the “Restart” option.
As the agent has now been restarted, you can check if the VPN is connected.
Disable Xbox Live service
- Click on the start menu option.
- Search for the “services” option
- Open the service window.
- Go to the “Names” option in the service option and look for the Xbox networking service
- Double-click the Xbox networking service option and head to the General tab
- Click the disable option in the general tab located with the start-up option. Click the Apply option to apply the setting, and then click the OK option.
Exit the menu and then reboot your PC. Your VPN on windows will be connected now.
Do a network drivers update.
- Right-click the start menu and select “Device Manager.”
- In the device manager window, open the network adapter settings.
- Right-click the TAP-windows adapter V9 option and then select update driver
- Click on the option to search automatically for updated driver software and follow the instructions.
Restart your PC, and your VPN will be connected.
Check the VPN Proxy settings.
- In the windows search bar, enter VPN settings.
- Click on the option and open VPN settings.
- Select your VPN connection from the VPN settings, and click on the advanced settings option
- In the new window, scroll down and check if your VPN proxy settings are correct, or select the “None” option to remove the proxy.
- Click on Apply and save your settings.
Now retry and connect your VPN to your PC
These steps and instructions will help you connect your VPN to Windows 10 without further errors. If the errors persist, you can perform a recheck on your authentication settings and try opening L2TP ports in the firewall.


