Do you want to share photos privately with your family and close friends? Read on to learn about iCloud photo sharing and everything you need to know about it.
Photo sharing is the latest trend in social media, and it has become popular. There are many benefits of iCloud photo sharing which can benefit you. This article will explore how you can use iCloud photo sharing for your benefit.
So, with this photo-sharing mode, you can access these pictures from any Internet device. This means that if you want to share some pictures with someone on the go, then you can do so without any problems whatsoever. Likewise, if someone else has shared some pictures with you, they will appear in your account automatically when they share them with you without any effort on your part!
This means that it doesn't matter where the picture was taken or by whom – if it has been shared with you, it will be stored in your account and available for viewing whenever needed! In addition, sharing isn't limited to just family members — it's open to anyone you want to include in your album.
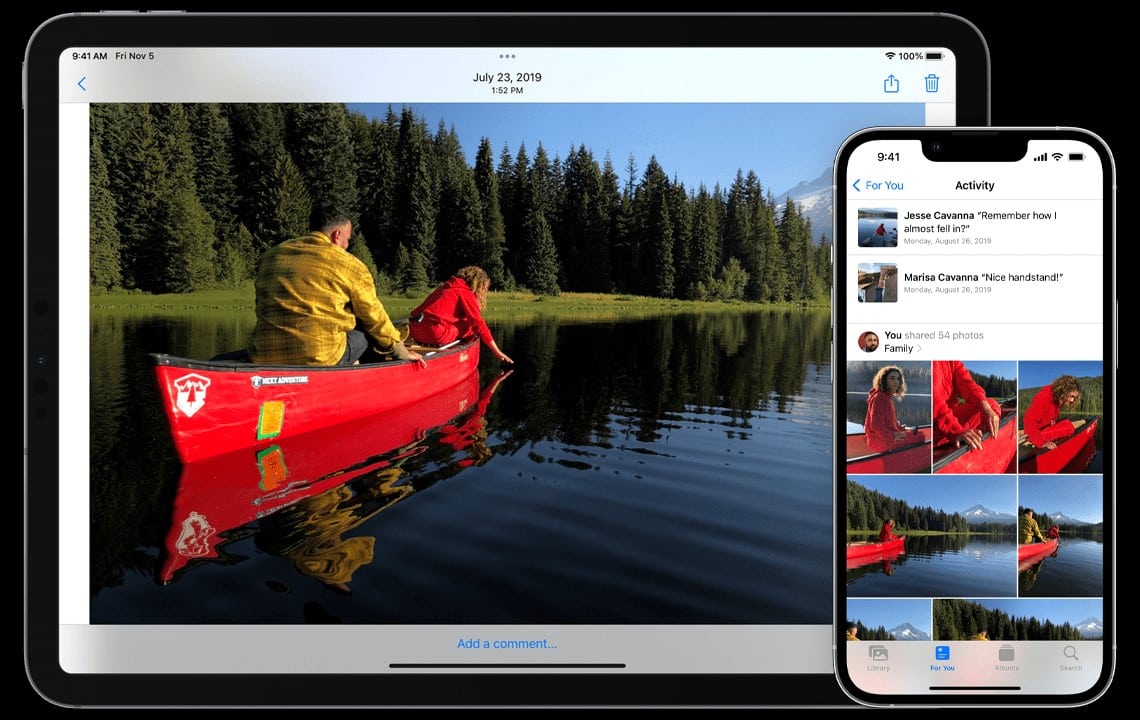
When someone views an iCloud Photo Sharing album, they can comment on photos and see the comments made by others. They can also like them. And if they have an Apple ID, they can even download the photos from the shared album so they can view them on their computer or other devices.
What is the Limit of iCloud Photo Sharing
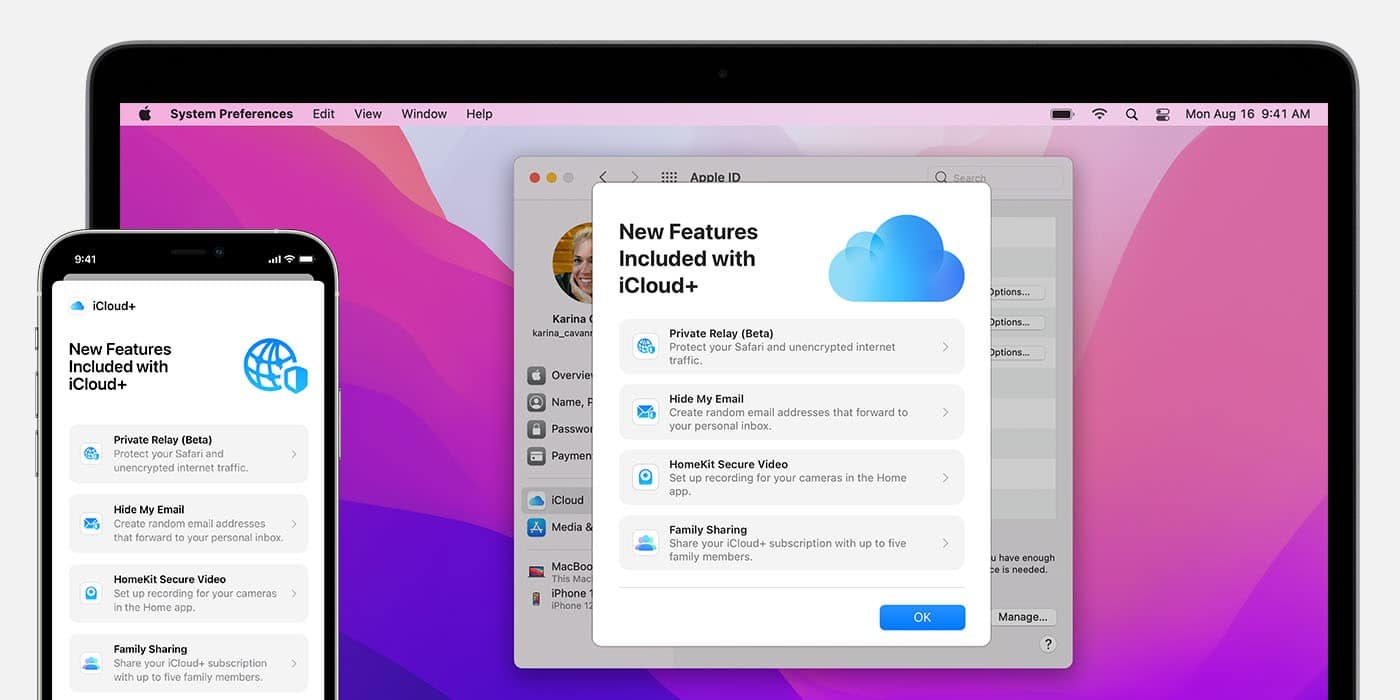
iCloud Photo Sharing allows you to share up to 5,000 photos and 200 albums. Furthermore, each shared album can store up to 5000 photos or videos. In addition, the photos in shared iCloud albums can only be viewed by people you've invited. You can then send it to a maximum of 100 people.
The fact that photos and videos in shared albums do not count against your iCloud storage limit is one of the advantages of iCloud photo sharing. This means you don’t have to worry about running out of space on your device when you use this feature. You can still use the free 5 GB of storage that Apple offers all iCloud users and an upgrade with more storage options at an additional cost.
How to Set Up iCloud Photo Sharing
iCloud Photo Sharing is one of those features that's easy to use, but confusing to set up the first time. Here's how to get iCloud Photo Sharing up and running on your iPhone or iPad.
Here's how:
Step 1: Launch [Settings] from your Home screen.
Step 2: Tap on the [iCloud] button.
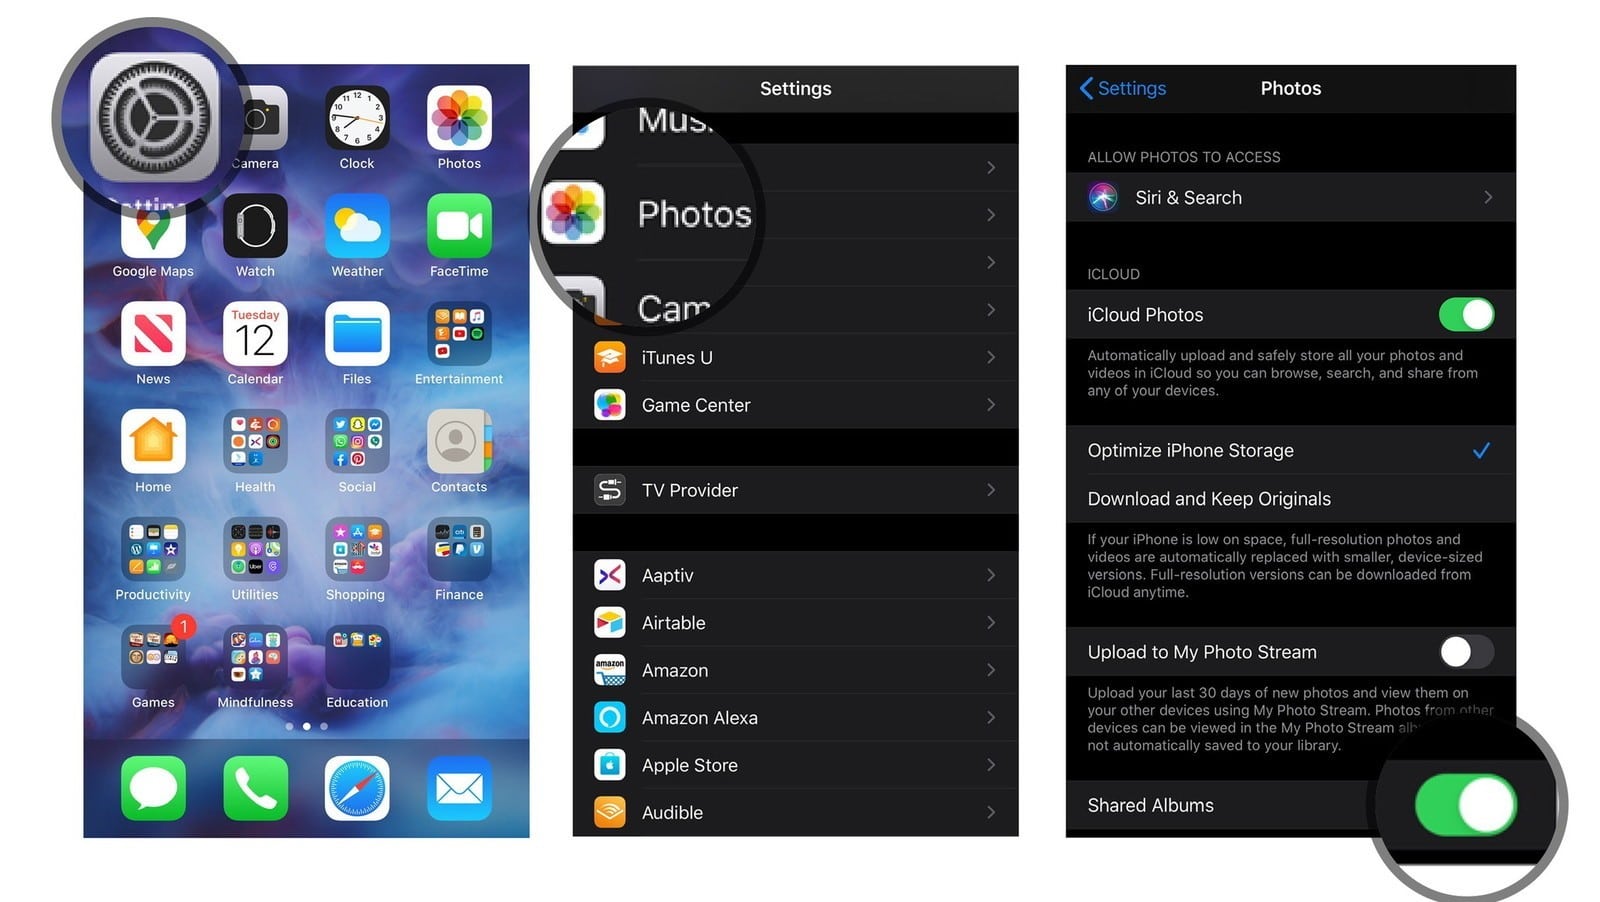
Step 3: Enter your Apple ID and password to access iCloud.
Step 4: Once signed in, Go to Settings > [Your Apple ID Name] > iCloud > Photos. If you don't see the Photos option, scroll down until you find it.
Step 5: At the bottom of the screen, enable the [Shared Albums] option.
How to Create iCloud Photo Sharing
Not only does iCloud Photo Sharing allow you to share your photos with friends and family; but you can also create a shared photo album, add photos and videos to an existing album, and invite other people to share.
To get started:
Step 1: On your iPhone, launch the [Photos] app.
Step 2: Touch the [Albums] button. Then, touch it again at the bottom of the screen to access the main album list.
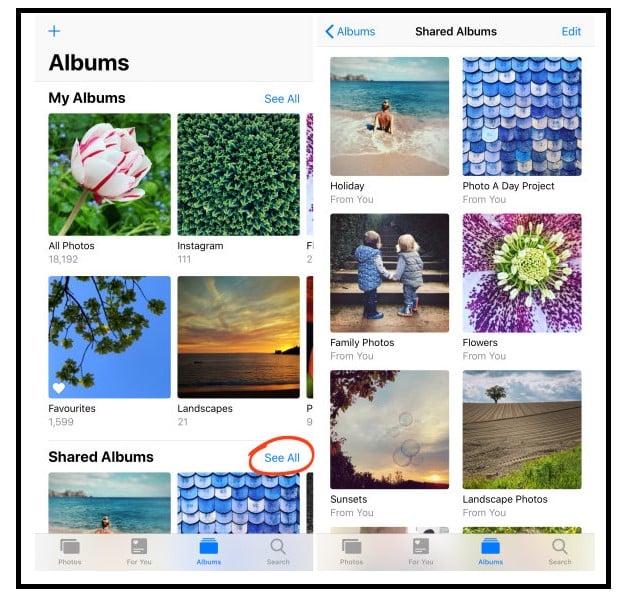
Step 3: Click the [See All] option in the [Shared Albums] folder. When you open the folder, you'll have access to all albums you've shared or that others have shared with you.
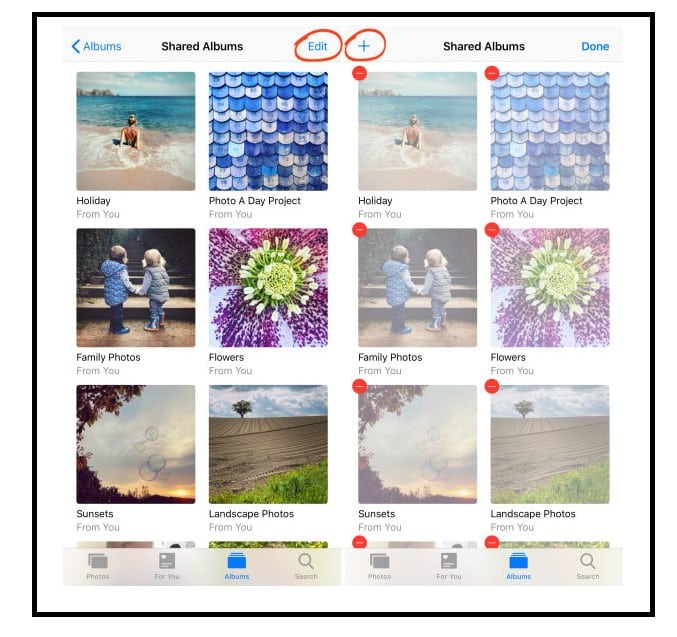
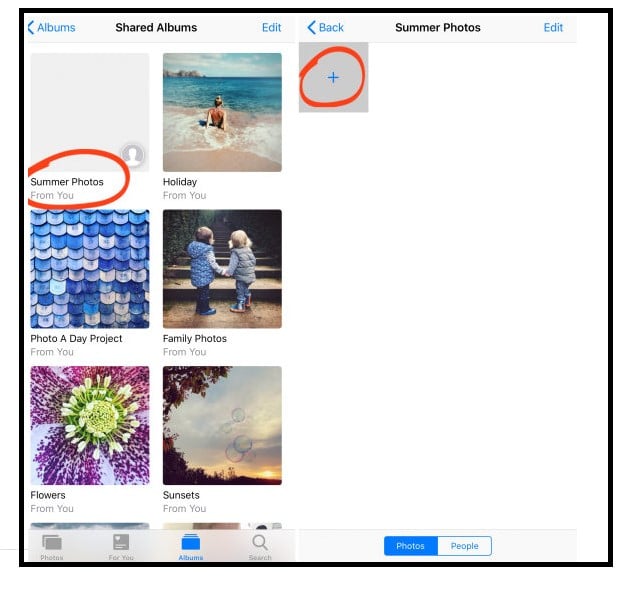
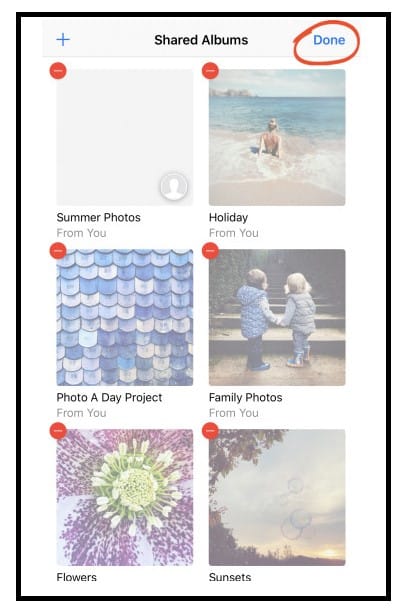
Step 4: Tap on the [Edit] button at the top right to make a new shared album. Then, in the top left corner, tap the [+] icon:
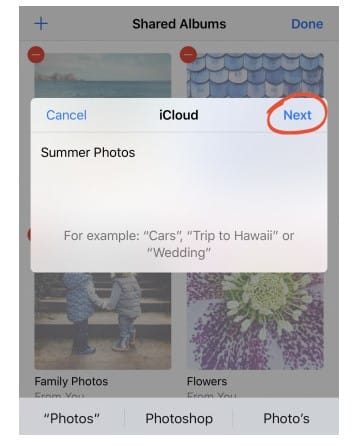
Step 5: Enter a [Name] for your shared album, then press the [Next] option. This will prompt people to subscribe to your shared album.
How to Add Photos to Your Shared Album
Shared albums are a great way to store photos and organize them with friends and family. You can add different types of media to the album, including videos, audio files, and documents.
Here's how to add photos to your shared album:
Step 1: First, tap on the newly created shared album. Then press the [+] button.
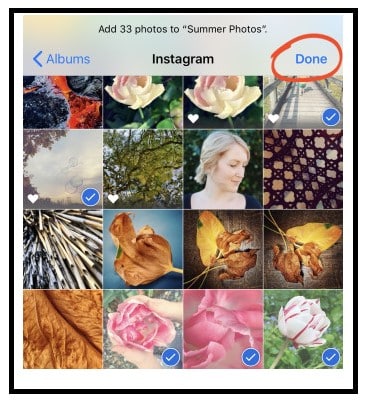
Step 2: Choose which photos you want to share. Then click the [Done] button.
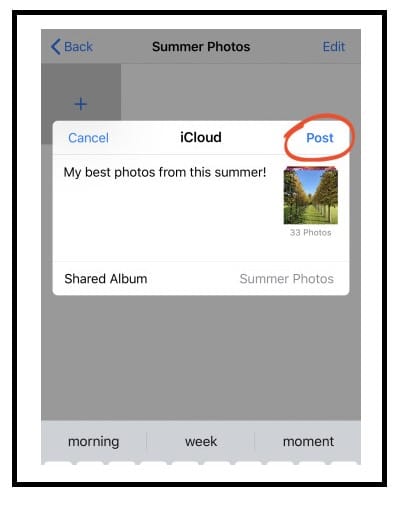
Step 3: If you wish, leave a comment. Then select the [Post] button: The images will be added to your shared album. People who have subscribed to that album will be able to see the added images:
Step 4: Click the [Back] button at the top left to leave the shared album.
How to Invite People to Your Shared Album
You can invite up to 100 people to view and collaborate on your albums. You can also invite people directly from Photos for Mac, or from iCloud.com, or any computer using the Mail app.
Invite the iCloud User
To invite someone:
Step 1: In the [To] box, enter their email address or phone number.
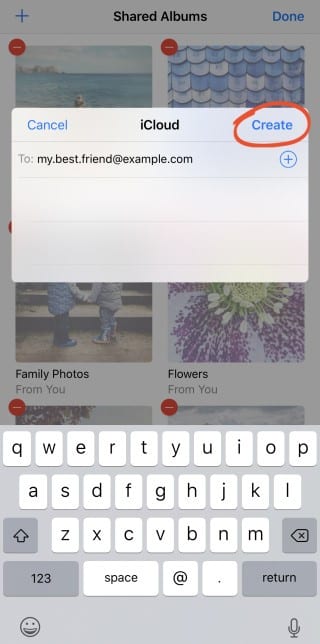
Step 2: To access your iPhone address book( contacts list) tap the [+] icon to the right of the [To] box. Then select the [Create] option:
Step 3: Your newly created shared album will be displayed at the top of the Shared Albums screen. At the top right, click on the [Done] button:
When emailing a user, you must use their iCloud Apple ID contact information. If you are not sure what email address they use on iCloud, you should ask them first; otherwise, they won't get the invite.
Share Albums with a Non-iCloud User
The iCloud Photo Library feature is a wonderful way to store and share photos across a number of devices. Anyone with an iCloud account can access photos stored in the cloud, but what if you want to share your photos with someone who doesn't have an iCloud account?
Here's how to do it:
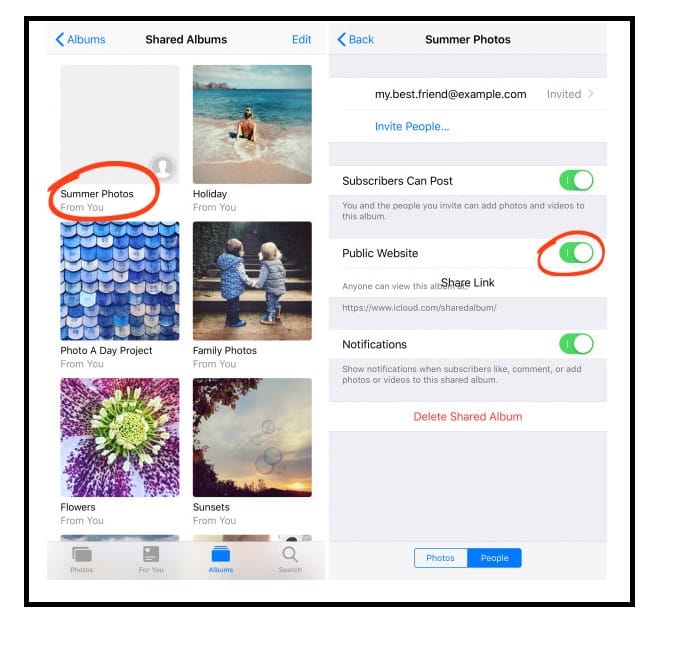
Step 1: Basically, make a shared album as outlined above, but do not add the person as a subscriber. Then open the newly created shared album and scroll down to the [People] tab. Toggle on the Public Website:
Step 2: On the com website, iCloud will establish a link to your shared album. Click the [Share Link] button to send that link to whoever you want. They will be able to access your shared album once they open the link.
Step 3: It's advisable that you check the settings for a new shared album after you've created it. Select the [People] tab at the bottom of your display to open the album:
Step 4: Set any preferences you would like for this shared album. The [Can Post] option means the ability for subscribers to add their own photos to your shared album. When present people on the iCloud account comment, like, or add photos to an album, you will be notified via the [Notifications] tab.
Step 5: Press the [Back] button in the upper corner to navigate back to the Shared Albums screen.
How to Do More with the iCloud Shared Album
The iCloud Shared Album is a great way to share photos with friends and family. But it’s also got some limitations, which can make it hard to use the way you want. But, if you want to do more with your iCloud Shared Album, here are some tips:
Delete Photos
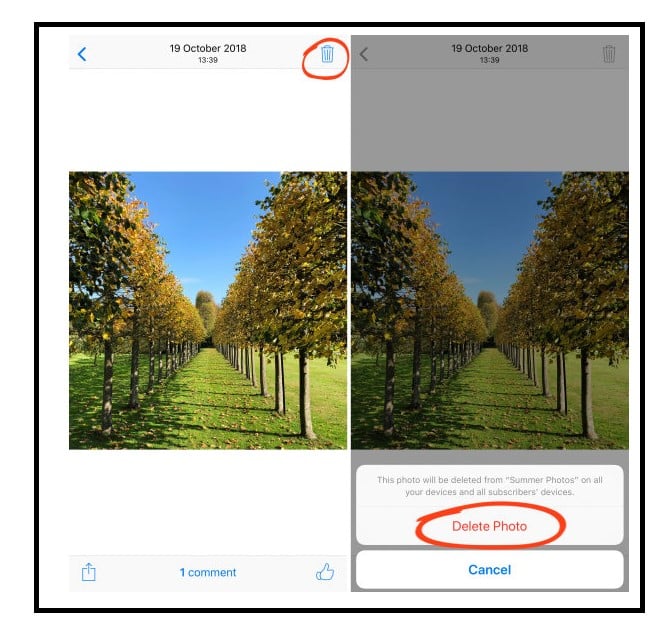
If you need to delete a photo from an iCloud shared album, follow the steps below.
Step 1: Choose the image to be deleted. Next, tap the Delete [trash] icon in the upper right corner. Then select the [Delete Photo] button:
Step 2: Once you delete a photo, it is removed from the shared album on all of your devices as well as the devices of all subscribers. However, it is not deleted from its original storage location in your iPhone's Photos app.
Delete Shared Album
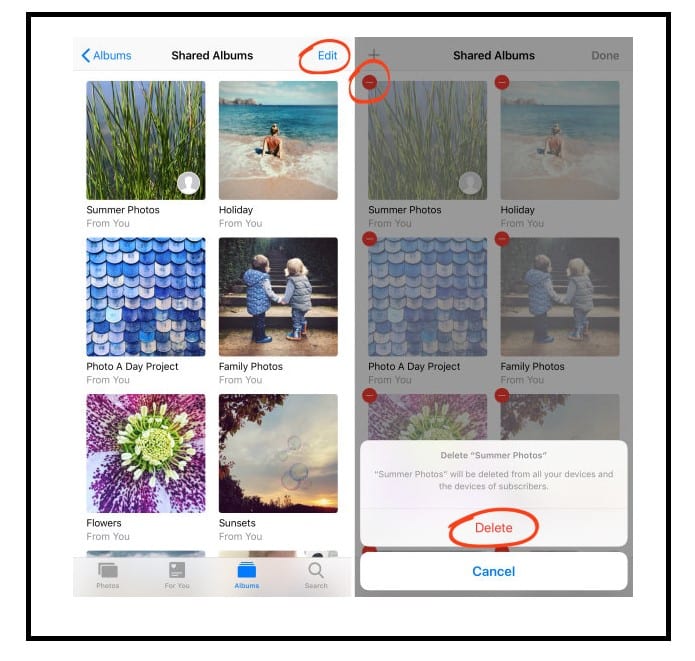
With the iCloud Shared Albums feature, you can share an entire album or just specific photos or videos with individuals or groups of people. But, if you want to delete a shared album, here's how to go about it:
Step 1: Tap on the [Edit] button at the upper right of the Shared Albums screen. Next, click the [red circle] next to the album you want to remove, then touch the [Delete] button:
Step 2: Once you delete the album, it will be deleted together with all the images in it. They will be removed from all subscribers' devices. So, the subscribers won't be able to view the shared album.
Remove People
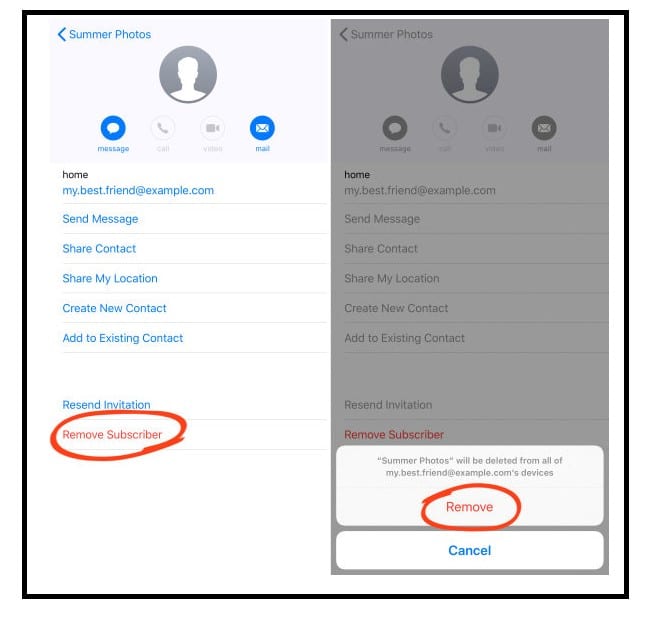
If you don’t want someone to be able to access your iCloud shared album anymore, follow these steps to remove the subscriber from your iCloud shared album.
Step 1: Click the [People] tab at the bottom of the screen after opening the shared album. You can find contact information for subscribers at the top of the screen:
Step 2: Click on the subscriber you want to remove from the shared Album. Touch the [Remove Subscriber] at the bottom of the page then select the [Remove] option.
Step 3: That way, the individual will no longer have access to the shared album.
Like & Comment
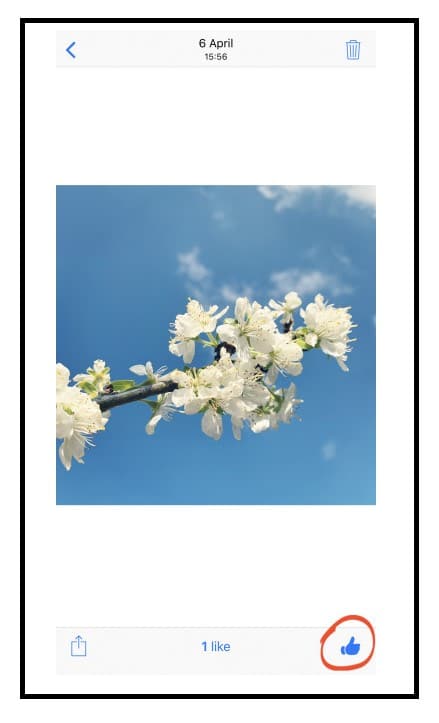
When you share an album with friends, family, or co-workers, it's easy for everyone to see what's been added to the collection. However, if you want to share your thoughts on a specific photo, you'll need to:
Step 1: To like the photo, click the Like (thumb) icon at the bottom right:
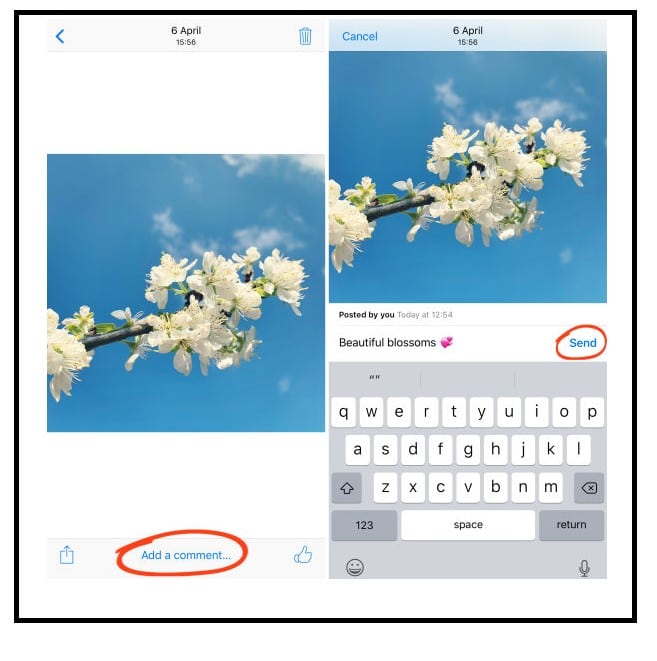
Step 2: Next, click the [Add A Comment] option at the bottom of the screen to leave a comment on a photo. Enter your comment and press the [Send] button:
Step 3: You'll need to keep scrolling to see the [Add A Comment] option if you've just liked a photo.
Save Photos
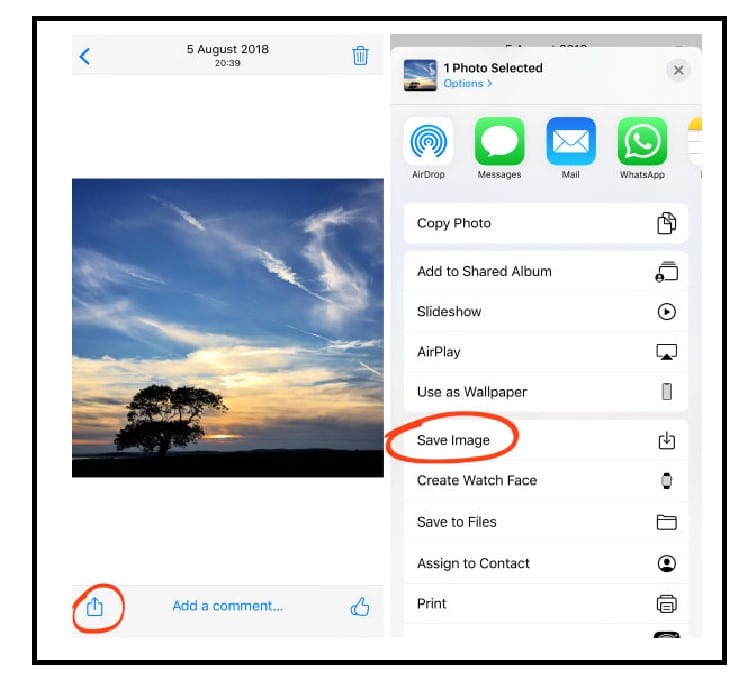
A shared album is a great way to share photos with friends and family, but if you want to save those pictures on your phone, you'll need to download them.
Here's how to do that.
Step 1: Click the [Share] icon (a square with a pointing upwards arrow). After selecting the photo you want to save, Scroll down and select the [Save Image] button.
Step 2: The image will now be saved both on your iPhone and in the shared iCloud album.
Step 3: So even if the photo's owner removes it from the shared album, the image will remain in your iPhone's Photos app. But you need to remember that following the same steps, other users can save your photos to their iPhone.
How to Accept the Invite with a Shared Album
When a friend invites you to view their album, they email you a link to the album. Once you click on the link, you'll be taken to a page explaining how to accept the invitation. You can choose whether or not to accept the invitation and what photos you want to make public. If you choose not to accept the invitation, your friend will receive an email telling them you declined their invitation.
But, if you want to accept the invite, here's what you should do:
Step 1: First, navigate to your Photos app.
Step 2: Select the [For You] option. The invitation should be at the top of the list.
Step 3: Accept the offer.
How to Access iCloud Shared Album
Here's how to access your shared album on iPhone:
Step 1: Launch the Photos app.
Step 2: Select the [Albums] option.
Step 3: Navigate to the [Shared Albums] category.

Why Can’t I Share the iCloud Shared Album?
Some limitations of iCloud can be quite annoying when sharing albums. If you have ever tried to share an album through iCloud and received an error message, you definitely know how it feels in that situation. Here are some of the common causes of such trouble:
Private Album

Check the privacy settings on the album. If it’s set to Private, then only people with whom you've shared the album can view it. Change the privacy setting to allow others to view it by choosing Public or Friends Only from the drop-down menu next to Privacy.
Failure to Enable Shared Album
If you have already shared an album, but it still doesn't work, go back into Settings > Photos & Camera > Shared Albums and enable the Shared Albums toggle switch.
Check Your Wi-Fi Network

First of all, make sure your Wi-Fi network connection is working properly. This is important because iCloud Photo Sharing requires a stable Internet connection to work properly. Any issue with your Wi-Fi network configuration or connection speed might cause problems with sharing albums via iCloud Photo Sharing. If you are having problems with sharing photos using iCloud Photo Sharing, check your Wi-Fi router settings first – maybe there are some issues with it.
Ensure iCloud Photos is Working
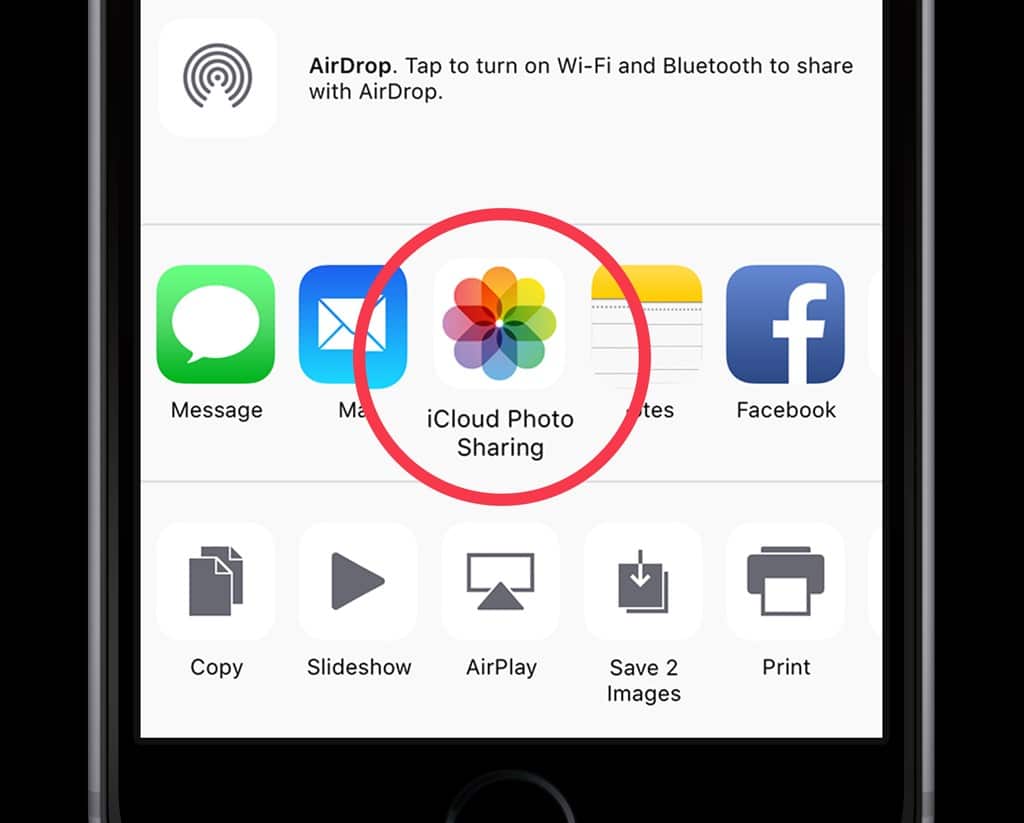
If there are no issues with your Wi-Fi router settings and if everything seems fine here, then make sure that iCloud Photos is turned on for the Photos app, and that iCloud Photo Library is enabled for the device. If either of these settings is disabled, you won’t be able to share an album on iCloud.
Conclusion
In the end, iCloud Photo Sharing isn't solely a photo-sharing app. It's also a tool for storing photos you're keeping for a special event or just for your personal use. The best part is that iCloud Photo Sharing is free, and if you have an iPhone or iPad, it's already there and ready to go. So there's no excuse not to get in on all of the fun.
So if you're looking for an awesome online photo management system that syncs all your photos across your devices, iCloud Photo Sharing is the best. It solves many problems of previous cloud photo storage services and brings the ease of photo sharing we never thought is possible.


